01. Installing MediaLibrary 3.5.x Shop
This article explains how to install MediaLibrary 3.5.x Shop for Joomla 3.x and deals with the MediaLibrary Admin menu.
After you have downloaded MediaLibrary 3.5.x from the http://ordasoft.com/Download/ or received an update through Email, you can start installing the component.
Check your PHP5 setup before you install, MediaLibrary Shop will work ONLY with PHP5 installed with the CURL, XSL and GD extensions.
You can check this in Joomla Admin panel through: System > System Information. In [PHP Settings] tab you will find everything you need to know about your PHP installation.
- If you don't run your own server, contact your provider in case:
- PHP5 is really activated for your account (many hosting providers have PHP5 available, but have PHP4 active by default!)
- All PHP5 extensions are available for you with your hosting account!
- View article PHP5 Extensions for MediaLibrary if you need more information
- If you have website with a hosting provider, you may need to ask them to set this up for you.
Important:
MediaLibrary will check for PHP5 and PHP5-extensions during the installation procedure, so please read the warning screens or result screens carefully and fix any issues mentioned before you go on. MediaLibrary will NOT RUN under PHP4!
MediaLibrary will NOT function properly without the needed PHP5-extensions!
Why doesn't MediaLibrary roll back the installation after warnings?
We can check for PHP5 and missing needed PHP5-extensions during the installation, it's not possible to roll back the installation after installation complete. This's just not possible under Joomla. So installation MediaLibrary 3.5.x Shop will always finish, even when warnings exist! Please read the installation warning screens carefully. If you get warnings:
- Uninstall MediaLibrary
- Fix the parts you received warnings about
- Install Joomla MediaLibrary again
Install MediaLibrary 3.5.x component for Joomla
To install MediaLibrary, log in to your Joomla Admin panel
Go to Extensions > Install/Uninstall, and browse to com_medialibrary_3.5.x_Shop.zip on your computer.
Click [Upload File & Install].
You will see a screen if all went well:

Then go to Components > MediaLibrary
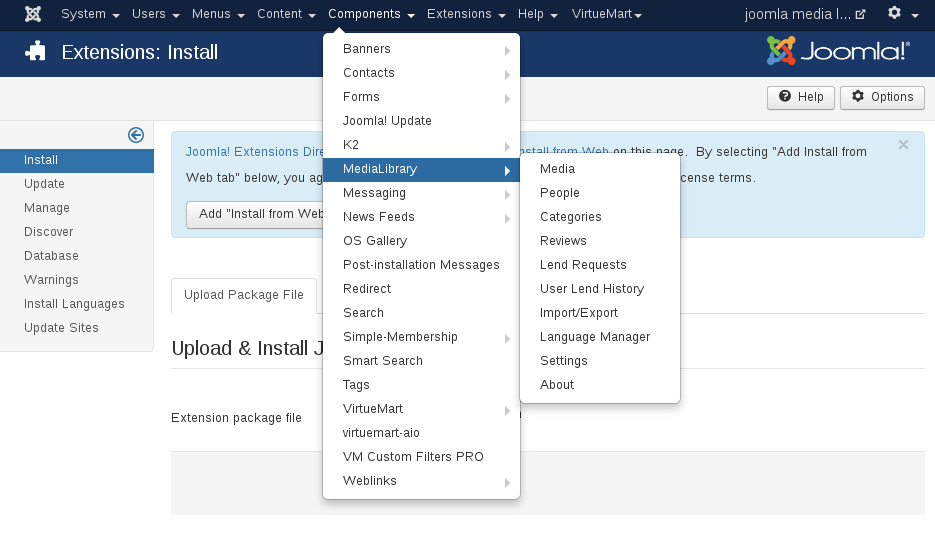
- MediaLibrary admin menu has the following entries:
- Media (to manage the media entries)
- People (to manage users, who added media files)
- Categories (to manage the media categories)
- Reviews (to manage user submitted media reviews)
- Lend Requests (to manage lend requests submitted from the frontend)
- User Lend History (to manage user lend requests)
- Import/Export (to import / export Medias from and to CSV or XML)
- Language Manager (to import / export Medias from and to CSV or XML)
- Settings (to manage the frontend/backend settings)
- About (notes, release notes and change log)
Remark about the language of the menu entries:
The language of the top menu entries is the part of the installation, which is not handled by the MediaLibrary language files. These entries are controlled by the medialibrary.xml file at installation time only. Menu entries in the horizontal top bar will follow MediaLibrary language file entries, but the top menu entries will not. So if you want that top menu entries will be the same as your own backend language (presuming it is not set to English), you need to adjust the medialibrary.xml file BEFORE you install!
MediaLibrary About
First, check out the Components > MediaLibrary > About page, and read the Notes.

Releasenote tab: information about version, license, developers etc

Changelog tab: information about updates of Media Library

we support payment systems