13. Entering Media manually in MediaLibrary 3.5.x Shop
In this article we will look at and explain the various fields in the MediaLibrary 3.5.x Shop Media edit interface which are used when entering all Media details manually.
Manual Media entry in MediaLibrary 3.5.x Shop
Manual Media entry in MediaLibrary 3.5.x Shop has one very simple principle:
As soon as you set Fetch Information: to On your own, then ALL fields become freely changeable for manual entry.
To enter Media manually in MediaLibrary, go to Components -> MediaLibrary -> Media in the Joomla Administration backend, then click on the [New] button in the top bar.
You will see the Media edit screen:
Filling in the details is fairly self-explanatory, but here is the description.
- MediaID
This is the MediaID for your internal reference.
Fill in your own internal MediaID here if you have set the option in Settings Backend for Auto-increment MediaID to NO.
If you have set YES, you do not need to do something with this field.
Tip about internal reference IDs (MediaIDs):
To make it easier for your internal administration, it is a good idea to use a numeric prefix for certain categories, for example all Media in the category "Joomla Media" will have their MediaID preceded by "01", all Media in the category "MySQL Media" will have their MediaID preceded by "02", etc.
You can then choose how many numerics you want to assign to Media, so you end up with MediaIDs like this for Media in the "Joomla Media" category: 01001, 01002, etc.
You can also use the MediaID field for indicating shelve storage location, or anything else you require. - ISBN/ASIN-10 (13)
This is the ISBN/ASIN-10 or ISBN/ASIN-13 Media number.
ISBN/ASIN-10 will always work, from any Amazon site.
ISBN/ASIN-13 will work reliably from Amazon CA, COM, UK. - Language
Select the language the Media is in from the dropdown box.
We will explain in a following article how you can add languages to MediaLibrary. - Category
Select the category the Media should belong to from the dropdown box. - Fetch Information
Since this Media's details are going to be manually filled in, we do not choose an Amazon web site here for fetching the information, but set this field to On your own. - Description
Enter the Media description here.
It will work reliably from Amazon COM.TIP
MediaLibrary allows for the use of external plugins inside the Media descriptions. You can use this for a variety of purposes. We will look at some examples in a following article.
- Upload eMedia. This field is for uploading an eMedia, which we will cover in the next article.
- Title. Fill in the Media title.
- Authors. Fill in the Media author or authors.
- Publisher. Fill in the Media publisher.
- Publication Date. Fill in the Media publication date.
- Price. Fill in the Media price, preceded by the currency symbol (Example: €14.95).
- Edition. Fill in the edition of the Media.
- Rating. Fill in the rating you want to give to the Media.
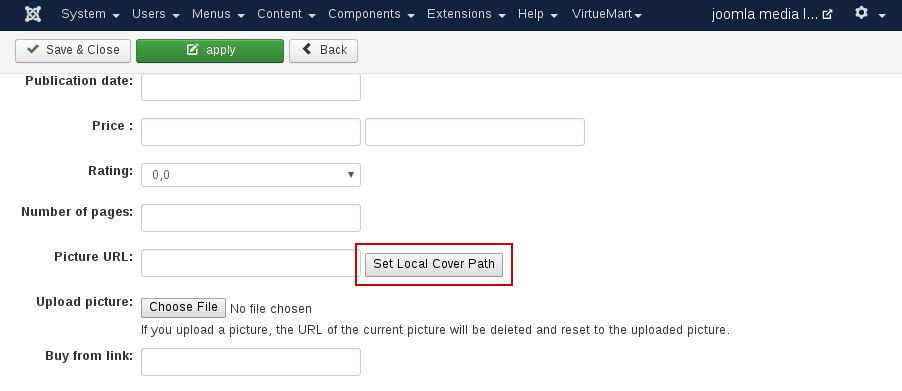
- Picture URL. Allows you to point to a URL for the Media cover.
- Set Local Cover Path (yellow arrow in the screenshot). This button allows you to set the path to the locally saved cover image automatically.
Explanation:
Even with Fetch Information set to On your own, if you previously retrieved the information from Amazon, then the cover path will still point to the cover image on the Amazon website. If you have set Download covers to YES in Configure Settings, then the cover will also be saved locally.
You need to fill in the path manually if you want the local cover to be used permanently. Cover pictures are saved with the ISBN/ASIN, so the path would be /components/ com_MediaLibrary / covers /
The button [Set Local Cover Path] does this for you by looking up the ISBN/ASIN in the covers directory .
If you uploaded a Media cover picture manually, then the path will be set to the local path automatically.- Upload picture
Allows you to upload a Media cover image from your local workstation.
The URL will automatically be reset to the uploaded picture. - [Buy From] Link
The URL which will be opened when you click the [Buy Now] button or Media cover.
With the Fetch Information field set to On your own, you are free here to enter any URL you like.
This means you can have this link point to a different Mediaeller, with your AffiliateID for that particular Mediaeller in it.In MediaLibrary Shop the affiliate link will be hidden behind the [Buy Now] button in the website frontend. When you hover over it you will only see an internal Joomla URL. Then this URL redirected to the real URL. This also protects the link with affiliateID from being visible to download managers. Save your edit All you have to do after that is save your Media entry.


we support payment systems