20. Exporting books to CSV in Book Library, book lending software
Book Library has options to export your books using CSV export, XML export and Full XML export. In this article we will explain the CSV Export and its results.
CSV Explanation
CSV stands for Comma-Separated-Values. Its filename extension is .csv or .txt, and it is a container for database information organized as field separated lists. You can read more on CSV on Wikipedia.
Book Library (book lending software) uses a separated values list where the separator character is a pipe character or |
CSV Export in Book Library
In the Admin backend, go to Components -> Book Library -> Import/Export and then click on the Export tab.
With the dropdown boxes, choose CSV as the Export Type and which Category to export from.

CSV Export in the backend
Now click the Export Books button in the top bar. You will see the following page:

CSV Export Result in the backend of Book Library
By clicking on the link, you can save the export file you just made to your local workstation. Change the name to reflect the category you are exporting
CSV Export from Book Library, Joomla book lending software
CSV export will contain all fields for further editing in a text editor or spreadsheet.
But please note that for subsequent import, only the following CSV format is supported:
BookID | ISBN | Title | Authors | Manufacturer | Release date | Language | Hits | Rating | Price | Url | Image Url | Edition | Ebook Url | Information from | Date | Price unit | Owner email | Number of pages | Comment
So, if you want to import later including Book Descriptions and Book Reviews, use XML export instead!
CSV Export in Excel (example)
Import the csv file into Excel (of course the procedure is very much the same with another spreadsheet application):- Data -> Import External Data -> Import Data
- Point to the csv file you exported earlier
- Next
- Select Other and the pipe character "|"
- Next
- Select OK, the result will look something like this:

Importing CSV to Excel/Libre Office Calc

Result of Importing CSV file to Libre Office Calc
It is a good idea to add a top row with column description if you are going to edit the fields for later import (already done in the example above).
- The columns exported are:
- BookID
- ISBN
- Title
- Authors
- Manufacturer
- Release date
- Language
- Hits
- Rating
- Price
- Url
- Image Url
- Edition
- Ebook URL
- Information from
- Date
- Price unit
- Owner email
- Number of pages
- Comment
IMPORTANT NOTE:
As mentioned before, please note that for subsequent import, only the following CSV format is supported:
BookID | ISBN | Title | Authors | Manufacturer | Release date | Language | Hits | Rating | Price | Url | Image Url | Edition | Ebook Url | Information from | Date | Price unit | Owner email | Number of pages | Comment |
So if you are only going to use this file to be edited for subsequent import after editing, then it is a good plan to delete the non-relevant columns.
Now you can edit the file to your liking, and then export it again to CSV when you're done. After that, you can import it again if you want.
In a next article we will show how to create a CSV for quick import of many books using only ISBN. This will allow you to import a large list of books and save a lot of time.
Make regular backups of your books
It is a good idea to do exports of your book categories every now and to keep them safe somewhere as a backup. This is certainly a good plan before changing BookLibrary, Joomla book lending software, version for example with an upgrade. With a small note of your Book Category names and these exports, you can always restore your BookLibrary content easily.
The columns exported are:
We recommend exports to XML for this because:
- They will contain all fields from your Book Library, including Book Descriptions and User Reviews
- They will give you the most flexible output (you can decide to later import into different categories, for example)
- They are totally database structure independent, so if there any changes in the BookLibrary database tables structure in a later version (which may happen when new functionality is added), then with XML exports available it will not ruin the effectiveness of your subsequent imports.
- Changed import-export.
In the next article we will look at XML export
19. Printing Reports in Book Library, Joomla bookstore software
We already knew how to use Books Manager in Book Library and in this article we will look at the option to print reports in Books Manager in Book Library, Joomla bookstore software.
In the Admin backend of Book Library, ebooks library software, go to Components -> Book Library -> Books
In the Books Manager select one or multiple books (checkmarks in front of the titles) which you want to print a report from. Then click the Print button on the top right. You will now see the following screen:
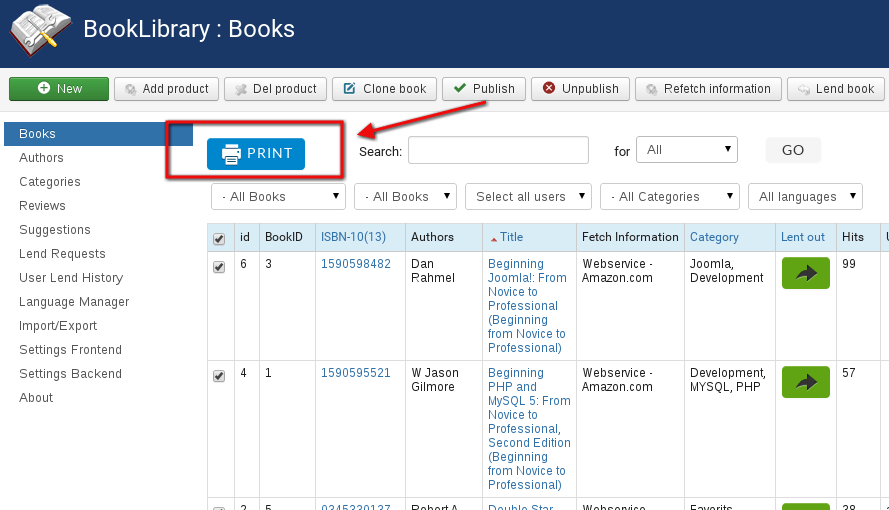
Printing books from the backend
- Font Size:
Select the font size you want with the dropdown box - Format:
Select the paper format you want with the dropdown box - Print checkboxes:
Select the columns you want to include in the Report print-out. When you have selected all the details you want, click the Next button. You will now see the preview screen according to the choices you made:
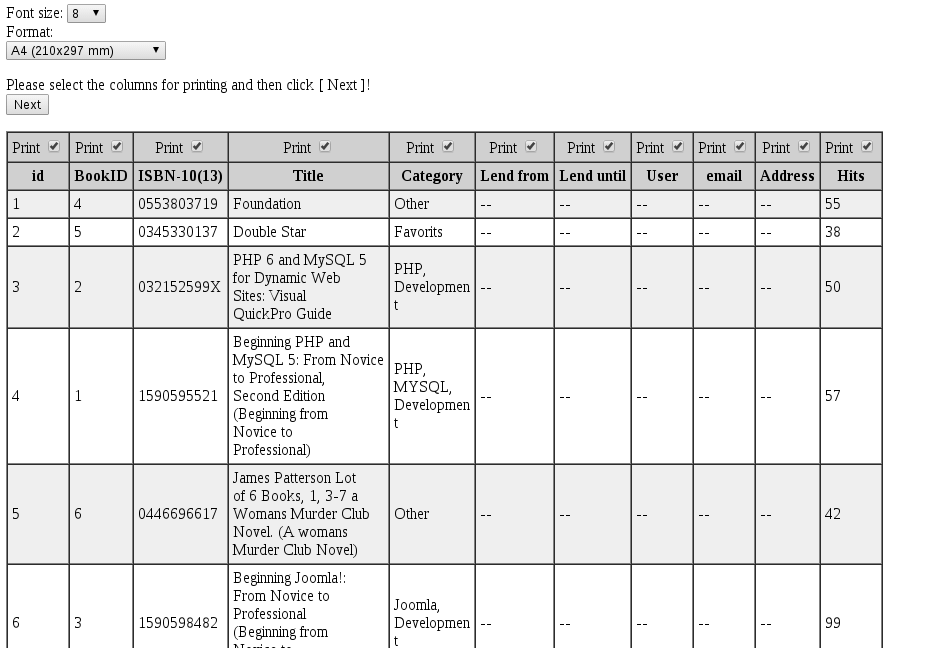
Print view from the backend
- Print
By clicking the Print button again, your printer selection screen will come up. You can print to a physical printer or to a PDF creator if you have that installed.
In the next article Exporting books to CSV in Book Library, Joomla bookstore software, will be covered.
18. Using the Books Manager in Book Library, Joomla book extension
In the previous articles we already saw how we can fetch book information from Amazon inside the Book Library, Joomla book extension. In this article we will take a closer look at the Book Library Books Manager and see how an administrator can use that interface to Publish, Unpublish, Lend or Return books.
The Books Manager in eBook management software
In the Admin backend, go to Components -> Book Library -> Books
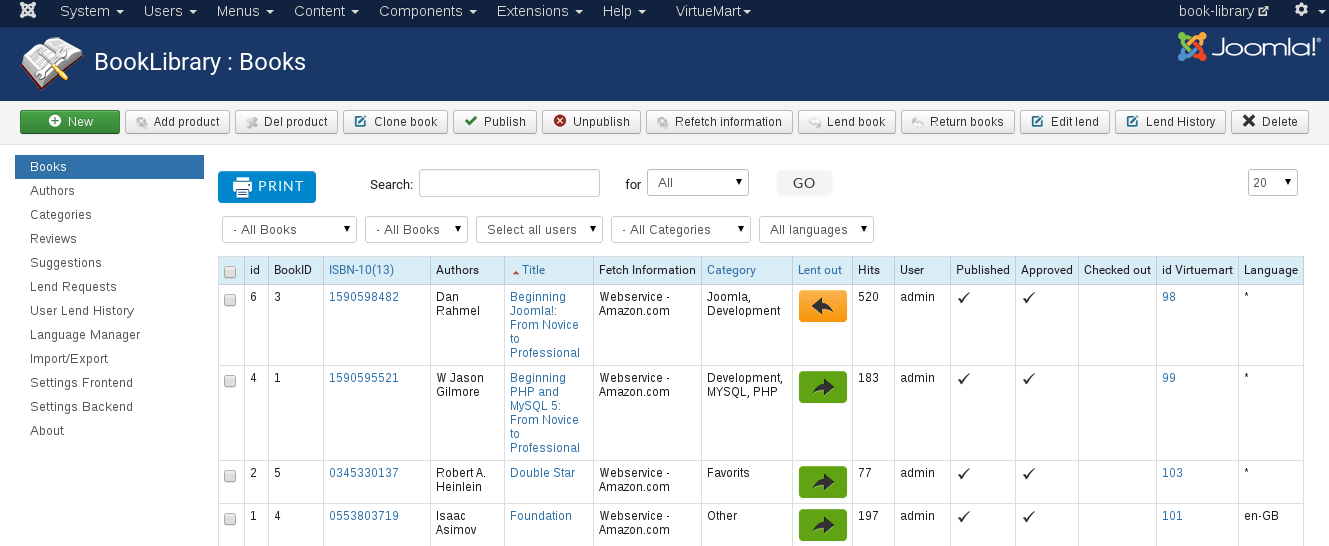
Books in the backend
From the Book Manager you can select one or multiple books (checkmarks in front of the titles) and then apply actions to them with the icons in the top bar.
- New
Create a new book entry - Del product
Delete selected books from VirtueMart - Add product
Add selected books to VirtueMart - Clone
Make the copy of selected book - Publish
Publish selected books,/li> - Unpublish
Unpublish selected books - Refetch Information
Fetch information from a different Amazon server for the selected books. This will allow you for example to get different language information or pricing with the different currencies by selecting a different Amazon server. The action will of course only apply to selected books. - Lend books
You can lend out the selected books to a particular user from here: - Lent to:
- User:
Fill in username - e-mail:
Fill in user email - Lent until:
Select the return date by clicking on the button (will show a calendar popup). - Return books
You can check in the selected books as being returned from here - Edit lend
Edit existing lend - Lend History
Show the Lend History of selected book - Delete
Deletes the selected book(s).
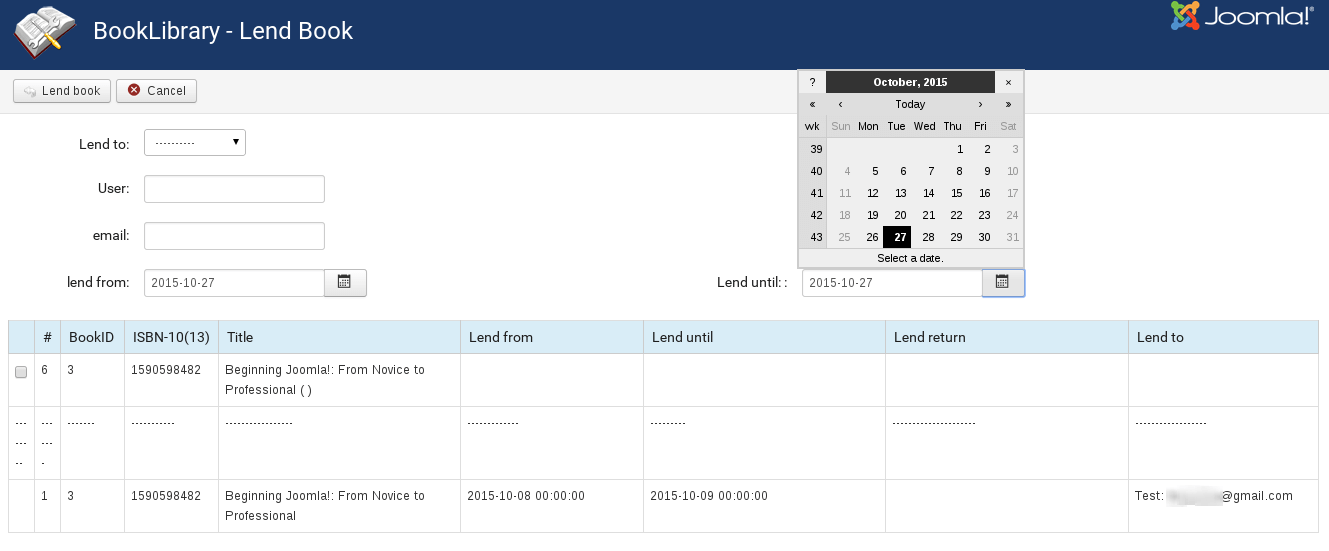
Lend book from the backend
Just select the user from the dropdown box
When you have filled in the details, click the Lend books button in the top bar. Once you have lent books out, they will show up inside the Books Manager with a Lent until: date.
In the next article we will see how to print reports in Joomla Books Manager.
17. Entering eBooks in Book Library, Joomla library extension
In this article we will look at how we can use Book Library - Joomla library extension for entering eBooks.
There are three ways of adding book to Book Library:
- through ISBN (retrieving the book information from Amazon) Read how to enter books using ISBN.
- manually, entering all book info by hand. Read how to enter books manually.
- and you can also use Book Library to enter eBooks.
First let's take a look at the configuration settings which affect eBooks in Book Library.
Configuration settings for eBooks in Book Library, Joomla library extension
Backend Settings
- eBook Support
Set this to YES. - Location of eBooks
Set the path to the folder where you want to store the uploaded eBooks.
Frontend Settings
- Show eBooks download link
Set to YES if you want to allow downloading ebooks from the frontend of your website. - Allow eBook download
Select the user groups which you want to allow to see the eBook download links. You can select multiple user groups for rights settings by using CTRL + click - Show ebook download license
Whether or not to display a license accept/refuse before allowing eBook download in the frontend, and with which text for the license. - License text for eBooks download license
Placed right to Show ebook download license option. Change the license text as you want it in the Language Manager. - Allowed Exts eDocument
Set here the allowed extensions of eBooks
Manual eBook entry in Book Library, Joomla library extension
To enter eBooks in Book Library (with the possibility to offer them for download), do the following. In the Admin backend, go to Components -> Book Library -> Books, then click New.You will see the following screen:
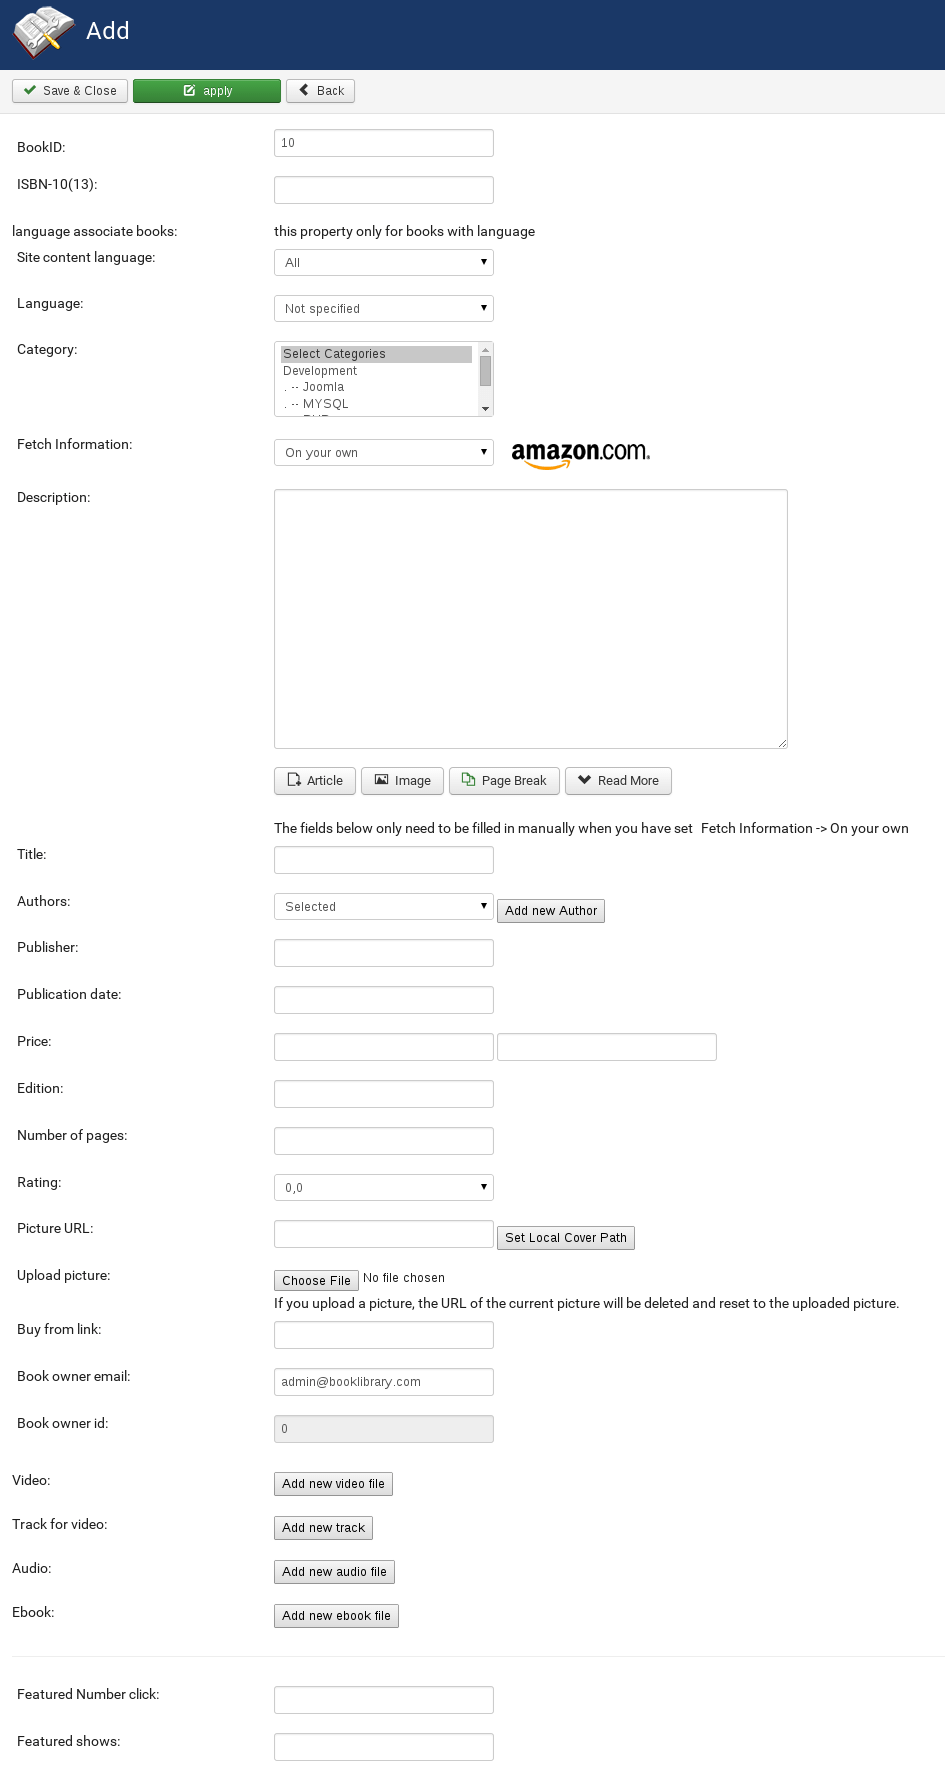
Adding book from the backend
Filling in the details is fairly self-explanatory, so we will not repeat all descriptions (you can find them in the previous article).
For ebooks (PDF) there are some things to notice however:
- ISBN-10
If the eBook does not have a real ISBN, remember to fill in a fake ISBN preceded by zero’s. If you have enabled ISBN duplicate checking in the configuration, you can use 0000000001, 0000000002, 0000000003, etc. for following ebooks. - Picture URL
Allows you to point to an URL for the book cover. You can fill this in manually if you want. But if you upload a picture from your local machine (next entry), then the path will be filled in automatically after you save the eBook entry. - Upload picture
Allows you to upload a book cover image from your local workstation. The path (entry above) will be filled in automatically after you save the eBook entry. - URL
The URL which will be opened when you click the Buy Now button or book cover. You can let this be filled in automatically (after saving the entry it will point to the uploaded file). But if you should for whatever reason need a custom URL here (for example if you want to point to a URL for the eBook on a remote server), then you can fill it in here. - Save
Save your entry, and you are done.
Frontend View for ebooks in Book Library, Joomla library extension
The e-book or PDF will now be visible in the frontend as a normal book. Clicking on the book cover will take you to the PDF details page with the description and other details. A download e-book link will appear on the details page if you specified that in Settings Frontend.

eBooks view in the frontend
- Buy Now
The Buy Now button will show an internal Joomla URL, which is subsequently redirected to the URL you specified in the backend (perhaps containing an affiliate ID).If you do not want to show a Buy Now button for certain ebooks, just put them in a separate book category and then in Settings Frontend specify for which book categories to show the Buy Now button.
You can select multiple categories there by using CTRL + click.
The link will show an internal Joomla URL when you hover over it, which is redirected inside Book Library to the real URL (for example it will not show that the eBook is actually on a remote server if your specified that). This also protects the real URL from being visible to download managers. - Download eBook
This is the eBook download link. Only visible when you have specified this in Settings Frontend, and only for the user groups you specified there. Again, the link will show an internal Joomla URL when you hover over it, which is redirected inside Book Library to the real URL (for example it will not show that the eBook is actually on a remote server if your specified that). This also protects the real URL from being visible to download managers.
Download eBook
When a user clicks the Download eBook link, they will see the following screen if you specified a license to be displayed first in Settings Frontend:
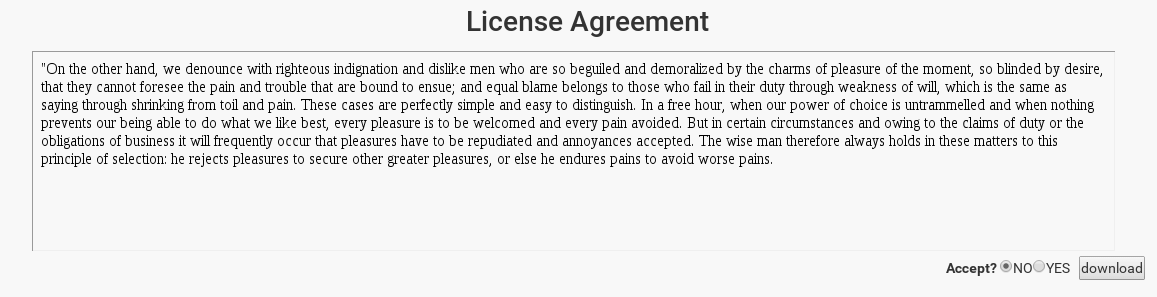
License agreement in the frontend
The download button is grayed out when Accept is set to NO, and available when Accept is set to YES. When the user selects YES and clicks, they will be presented with a "file open" or "download save" window. And that concludes the eBook entry procedure.
In the following articles we will cover the managing of books in Book Library.
16. Entering books manually in online library catalog software
In this article we will look at and explain the various fields in the Book Library book edit interface which are used when entering all book details manually.
There are three ways of adding book to Book Library (online library catalog software):
- through ISBN (retrieving the book information from Amazon) Read how to enter books using ISBN.
- manually, entering all book info by hand.
- and you can also use Book Library, online library catalog software, to enter eBooks. Read how to enter eBooks
Manual book entry in Book Library, Online Library Catalog Software
Manual book entry in Book Library has one very simple principle: As soon as you set Fetch Information: to On your own, then ALL fields become freely changeable for manual entry. To enter books manually in Book Library, go to Components -> Book Library -> Books in the Joomla Administration backend, then click on the New icon in the top bar.
You will see the book edit screen (we will explain all fields below the screenshot):
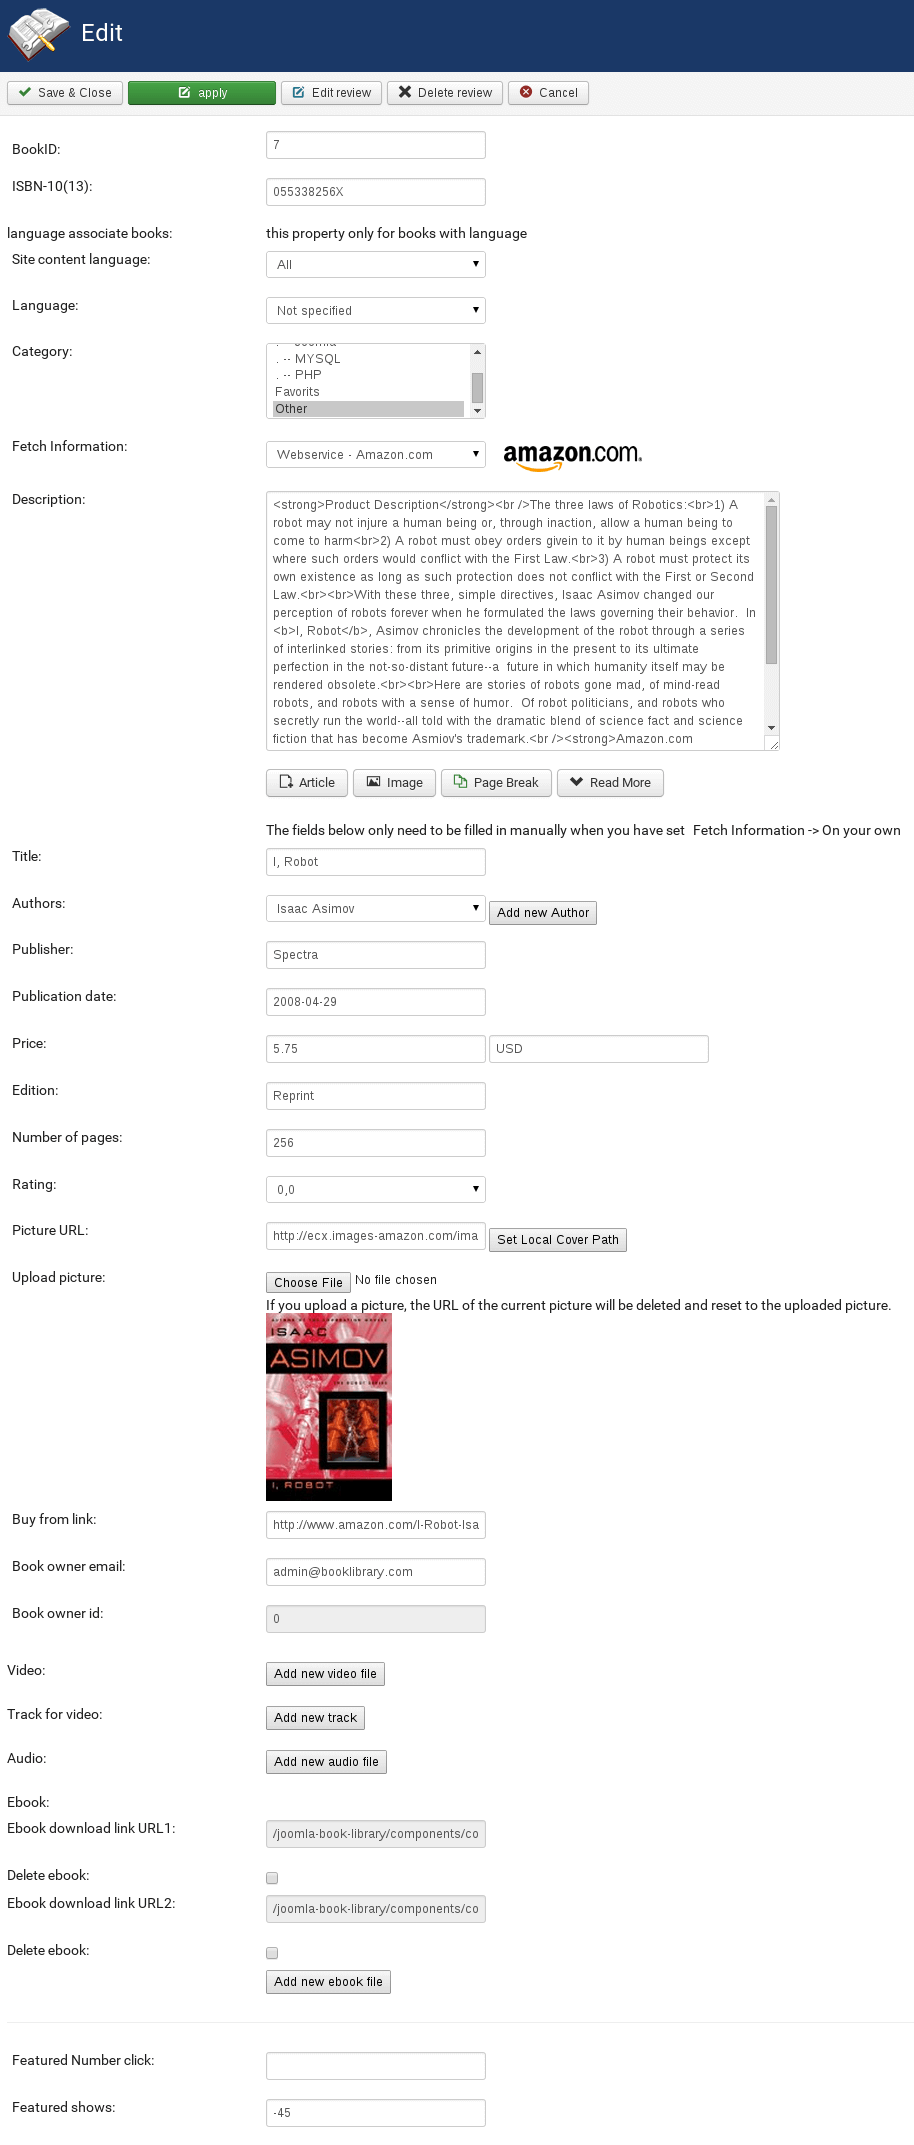
Editing book from the backend
Filling in the details is fairly self-explanatory, but here are the descriptions.
- BookID
This is the BookID for your internal reference. Fill in your own internal BookID here if you have set the option in Settings Backend for Auto-increment BookID to NO. If you have set that option to YES, you do not need to bother with this field.
Tip about internal reference IDs (BookIDs): To make it easier for your internal administration, it is a good idea to use a numeric prefix for certain categories, for example all books in the category "Joomla books" will have their BookID preceded by "01", all books in the category "MySQL books" will have their BookID preceded by "02", etc. You can then choose how many numerics you want to assign to books, so you end up with BookIDs like this for books in the "Joomla books" category: 01001, 01002, etc. You can also use the BookID field for indicating shelve storage location, or anything else you require. - ISBN-10 (13)
This is the ISBN-10 or ISBN-13 book number. ISBN-10 will always work, from any Amazon site.ISBN-13 will work reliably from Amazon CA, COM, UK. - Language associate books
Use this option for multilingual Joomla websites in order to connect books in different languages. - Language
Select the language the book is in from the dropdown box. We will explain in a following article how you can add languages to Book Library. - Category
Select the category the book should belong to from the dropdown box. - Fetch Information
Since this book's details are going to be manually filled in, we do not choose an Amazon web site here for fetching the information, but set this field to On your own. - Description
Enter the book description here. - Upload eBook
This field is for uploading an eBook, which we will cover in the next article. - Title
Fill in the book title. - Authors
Fill in the book author or authors. - Publisher
Fill in the book publisher. - Publication Date
Fill in the book publication date. - Price
Fill in the book price, preceded by the currency symbol (Example: €14.95). - Edition
Fill in the edition of the book. - Rating
Fill in the rating you want to give to the book. - Picture URL
Allows you to point to a URL for the book cover. - Set Local Cover Path (yellow arrow in the screenshot)
This button allows you to set the path to the locally saved cover image automatically.
TIP: Book Library allows for the use of external plugins inside the book descriptions. You can use this for a variety of purposes. We will look at some examples in a following article.
Explanation:
Even with Fetch Information set to On your own , if you previously retrieved the information from Amazon, then the cover path will still point to the cover image on the Amazon website. If you have set Download covers to YES in Settings Backend, then the cover will also be saved locally. You need to fill in the path manually if you want the local cover to be used permanently. Cover pictures are saved with the ISBN, so the path would be /components/com_booklibrary/covers/.jpg. The button Set Local Cover Path does this for you by looking up the ISBN in the covers directory.
If you uploaded a book cover picture manually, then the path will be set to the local path automatically.
- Upload picture
Allows you to upload a book cover image from your local workstation. The URL will automatically be reset to the uploaded picture. - Buy From Link
The URL which will be opened when you click the Buy Now button or book cover. With the Fetch Information field set to On your own,you are free here to enter any URL you like. This means you can have this link point to a different bookseller, with your Affiliate ID for that particular bookseller in it. As always in Book Library Shop, the affiliate link will be hidden in the website frontend when you hover over it, where users will only see an internal Joomla URL. Inside Book Library this is then redirected to the real URL. This also protects the link with affiliate ID from being visible to download managers. - Book owner email
The email of book owner - Book owner id
ID of book owner - Video
Allows to insert video from YouTube or local directory - Track for video
- Audio
- eBook
- Featured Number click
Can be used in Featured module - Featured shows
Save your edit - all you have to do after that is save your book entry.
More Articles...
Page 3 of 6
we support payment systems