Ordasoft website development company

Create a Joomla MySQL Database

Method 1: If you have cPanel on your hosting:

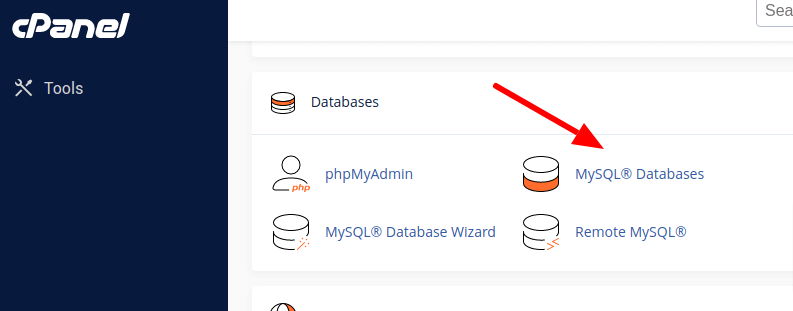
1. Log in to your hosting control panel. Look for the "MySQL Databases" or "Database" section.

cpanel create database section cpanel create database section

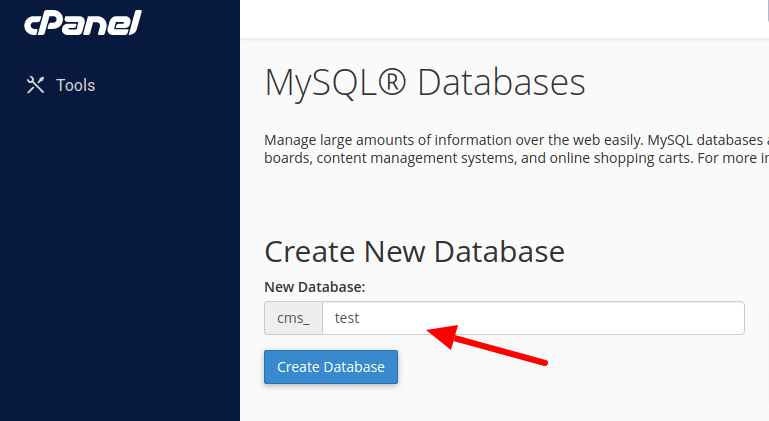
2. Create a database.

cpanel create database cpanel create database

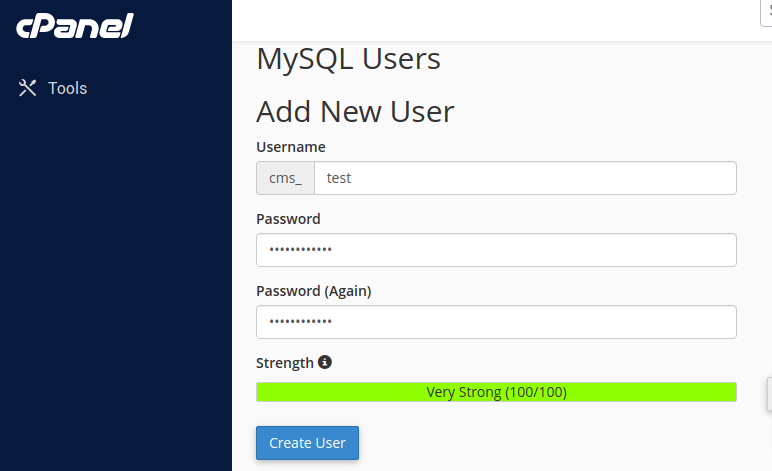
3. Create user for the database.

cpanel create user for database cpanel create user for database

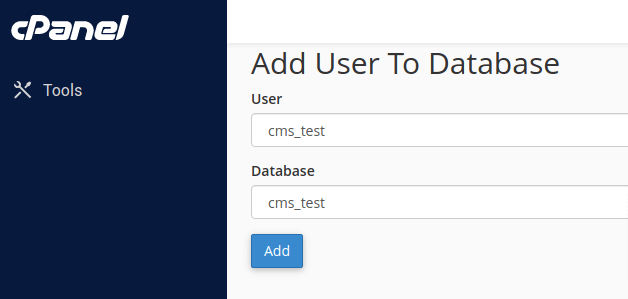
4. Add user to the database.

cpanel add user to database cpanel add user to database

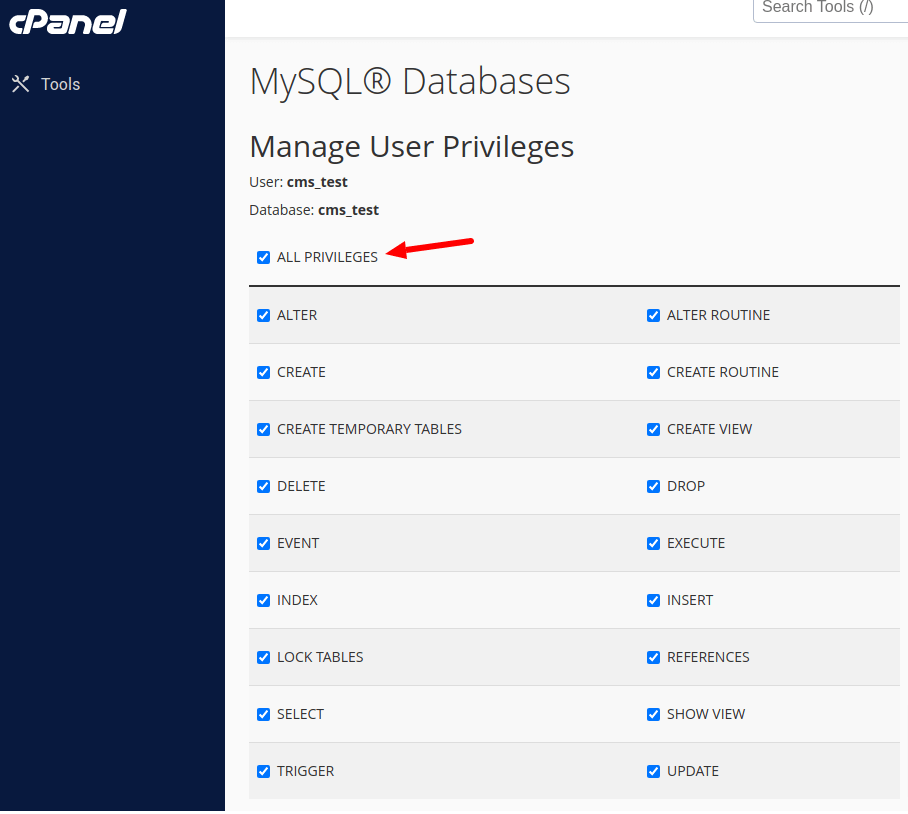
5. Add to user all privileges to database.

cpanel add to user all privileges to database cpanel add to user all privileges to database

Method 2: If you have database wizard on your hosting

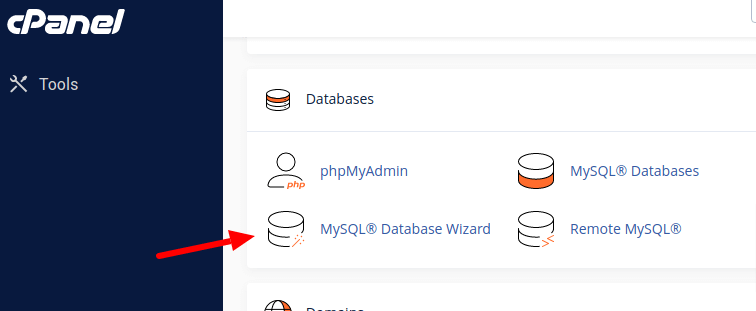
1. Look for the "database wizard" in "MySQL Databases" or "Database" section.

cpanel create database wizard cpanel create database wizard

2. Next steps the same as in "Method 1" .

Method 3: If you have PhpMyAdmin on your hosting

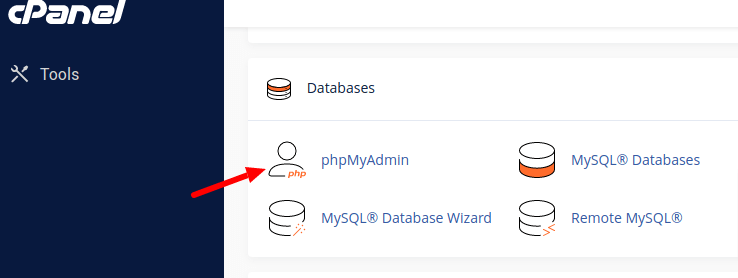
1. Look for the phpMyAdmin in "MySQL Databases" or "Database" section.

cpanel phpmyadmin section cpanel phpmyadmin section

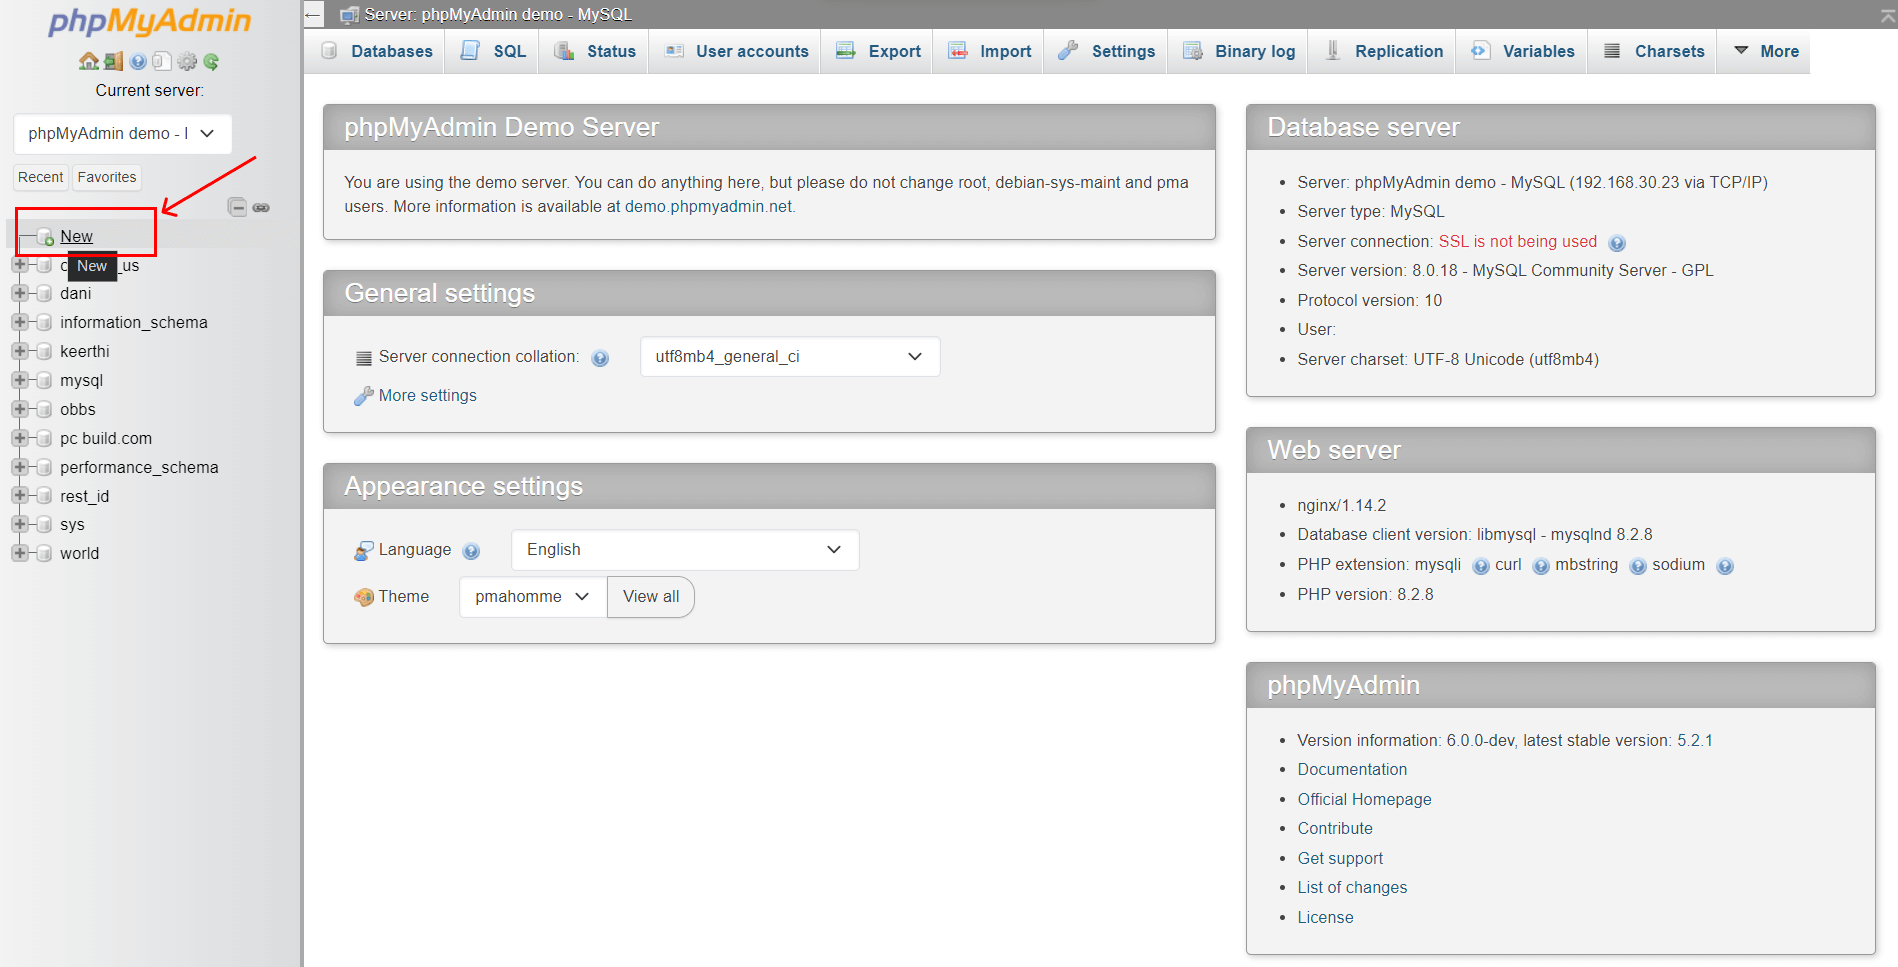
2.1 Create a new database, step 1.

joomla install php my admin new joomla install php my admin new

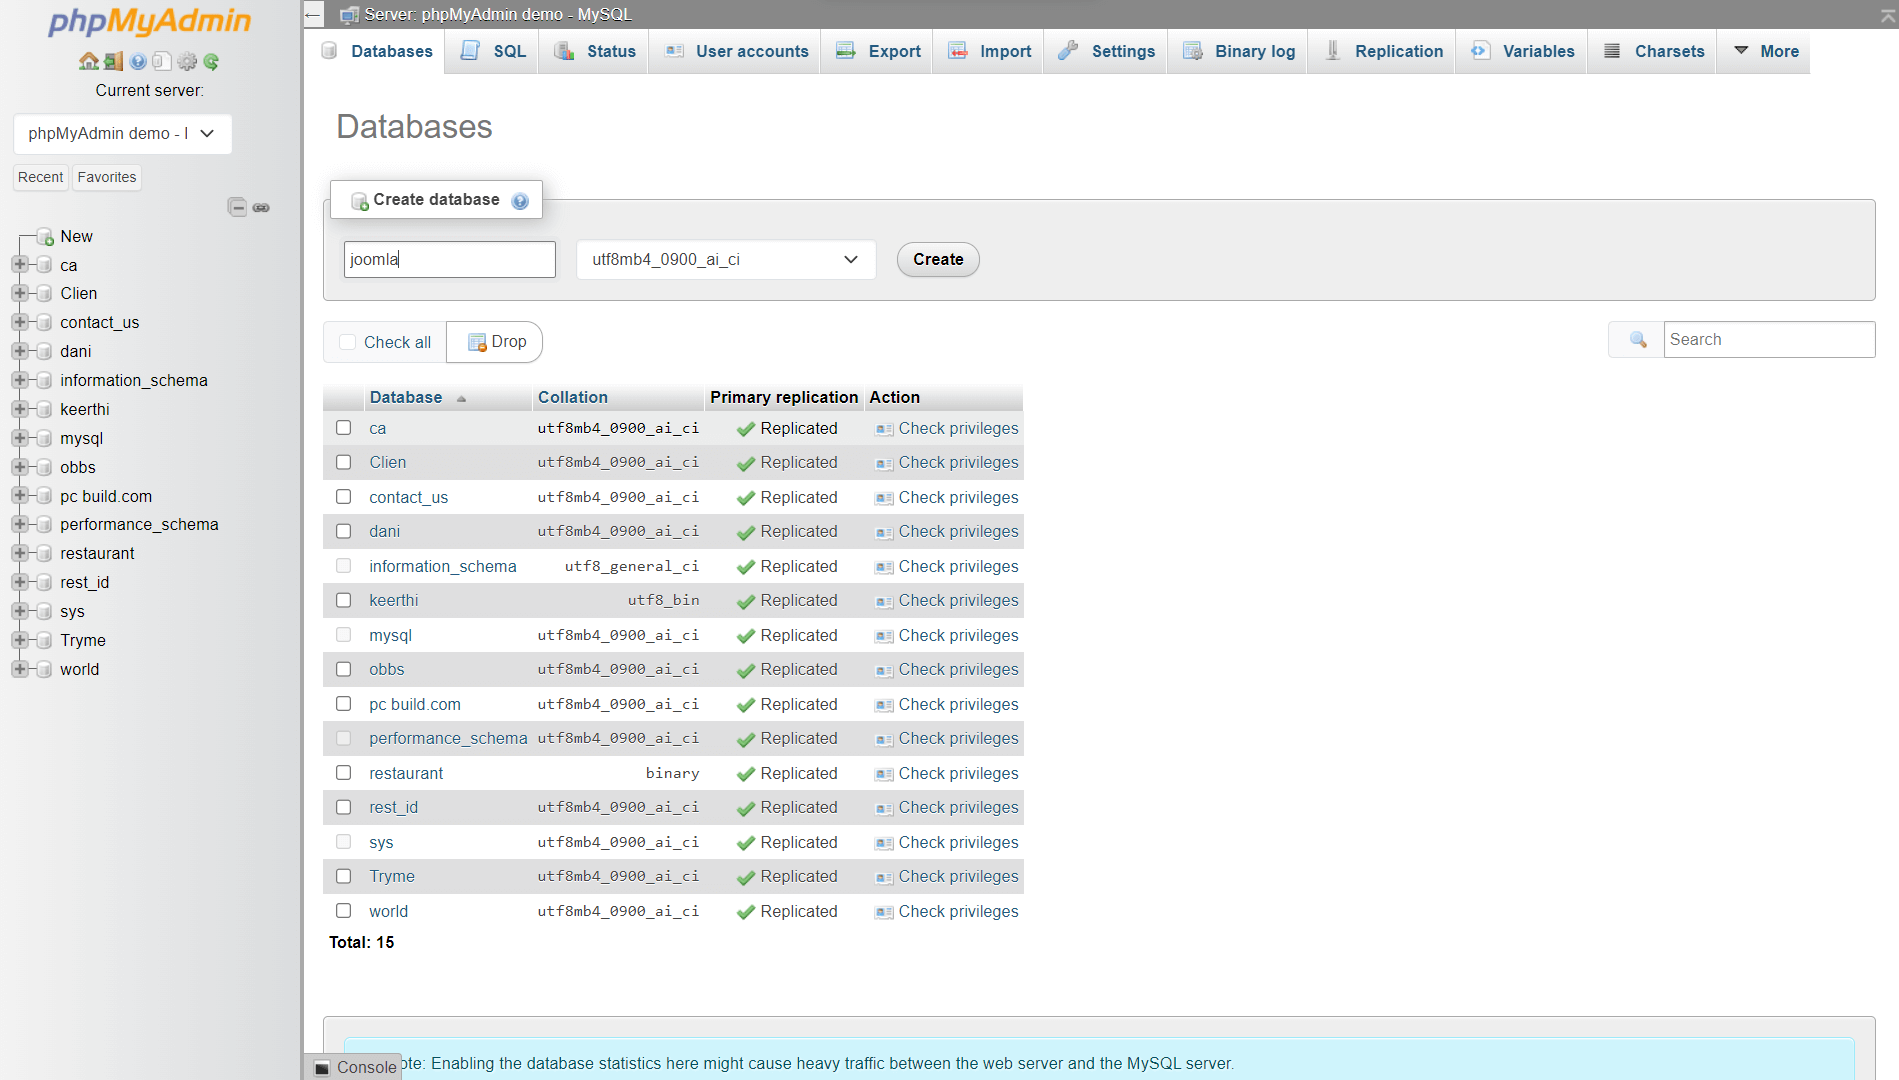
2.2 Create a new database, step 2.

joomla install php my admin database joomla install php my admin database

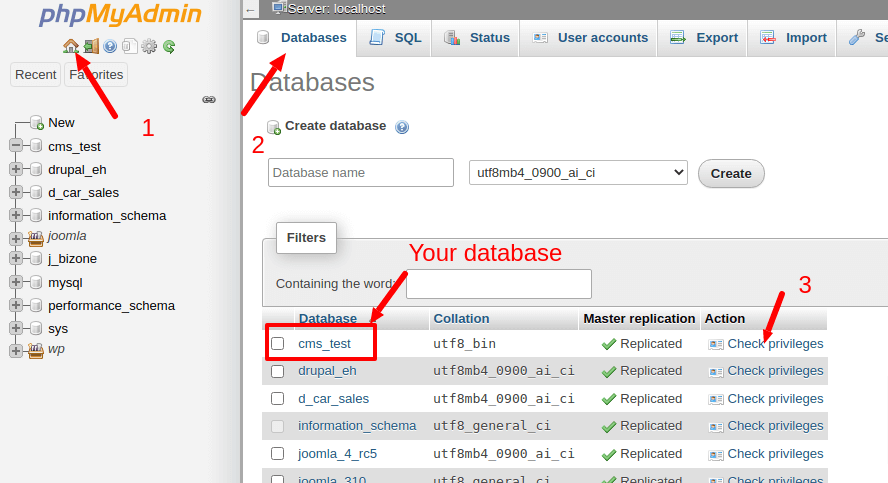
3.1 Database user create, step 1.

phpmyadmin database user create phpmyadmin database user create

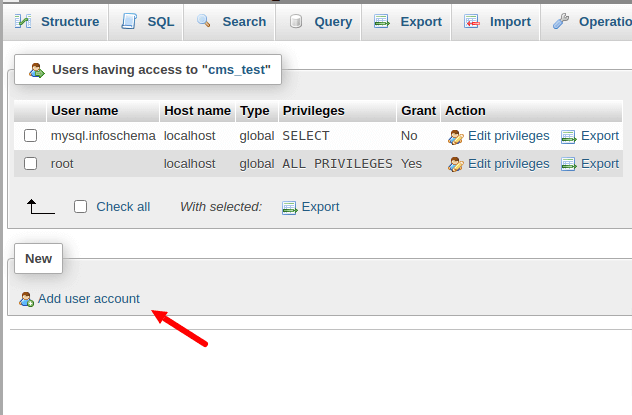
3.2 Database user create, step 2.

phpmyadmin database user create step 2 phpmyadmin database user create step 2

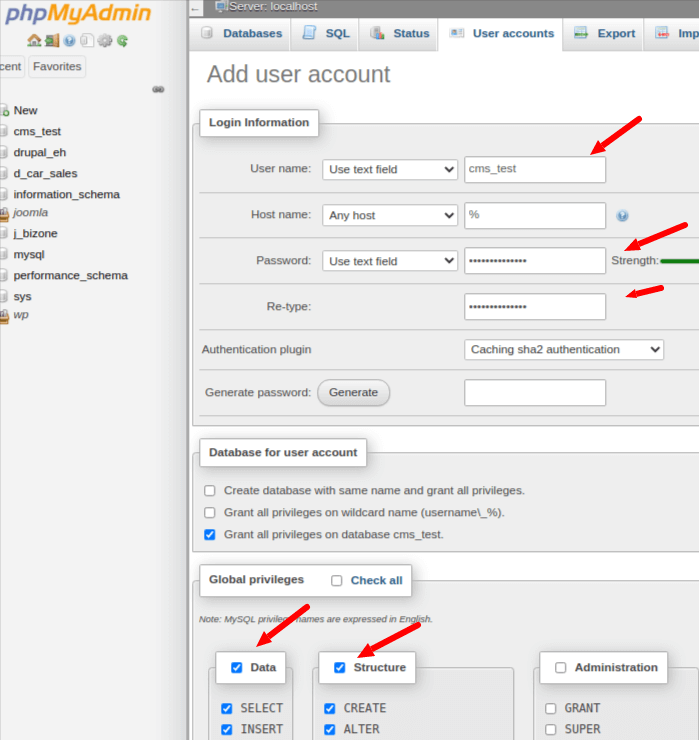
3.3 Database user create, step 3.

phpmyadmin database user create step 3 phpmyadmin database user create step 3

Method 4: If you have PhpMyAdmin on your hosting but don't have method for create Database

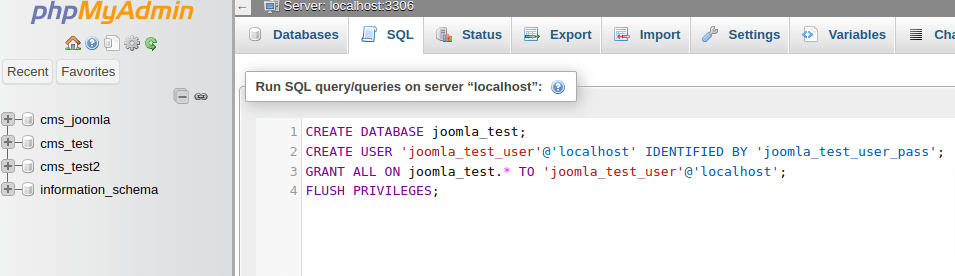
Go to PhpMyAdmin. Don't select any Database at right sidebar, go to SQL tab instead. Add this code:

CREATE DATABASE joomla_test; 
CREATE USER 'joomla_test_user'@'localhost'
IDENTIFIED BY 'joomla_test_user_pass'; GRANT ALL ON joomla_test.* TO 'joomla_test_user'@'localhost'; FLUSH PRIVILEGES;

Where:

joomla_test - your database name

joomla_test_user - your database user name

joomla_test_user_pass - your database password for user name

phpmyadmin database create phpmyadmin database create

Method 5: If you have SSH access on your hosting:

1. Login to your hosting using any SSH client. Under windows this may be "putty", under Linux, Unix and Mac - the SSH client build in in core. Run any terminal or Console and type there:

ssh your_host_user@your_website_name 

Type "yes" - for sertificate access check, Type: password to your host.

2. When you login to your hosting with help any SSH client. Type here:

mysql -u root 

Because you access to ssh as root, you son't need to insert any password.

3. Create your database and user. Type:

CREATE DATABASE joomla_test;
CREATE USER 'joomla_test_user'@'localhost' 
IDENTIFIED BY 'joomla_test_user_pass'; GRANT ALL ON joomla_test.* TO 'joomla_test_user'@'localhost'; FLUSH PRIVILEGES;

Where:

joomla_test - your database name

joomla_test_user - your database user name

joomla_test_user_pass - your database password for user name

 
Ordasoft website development company

How To Install Joomla

Download Joomla

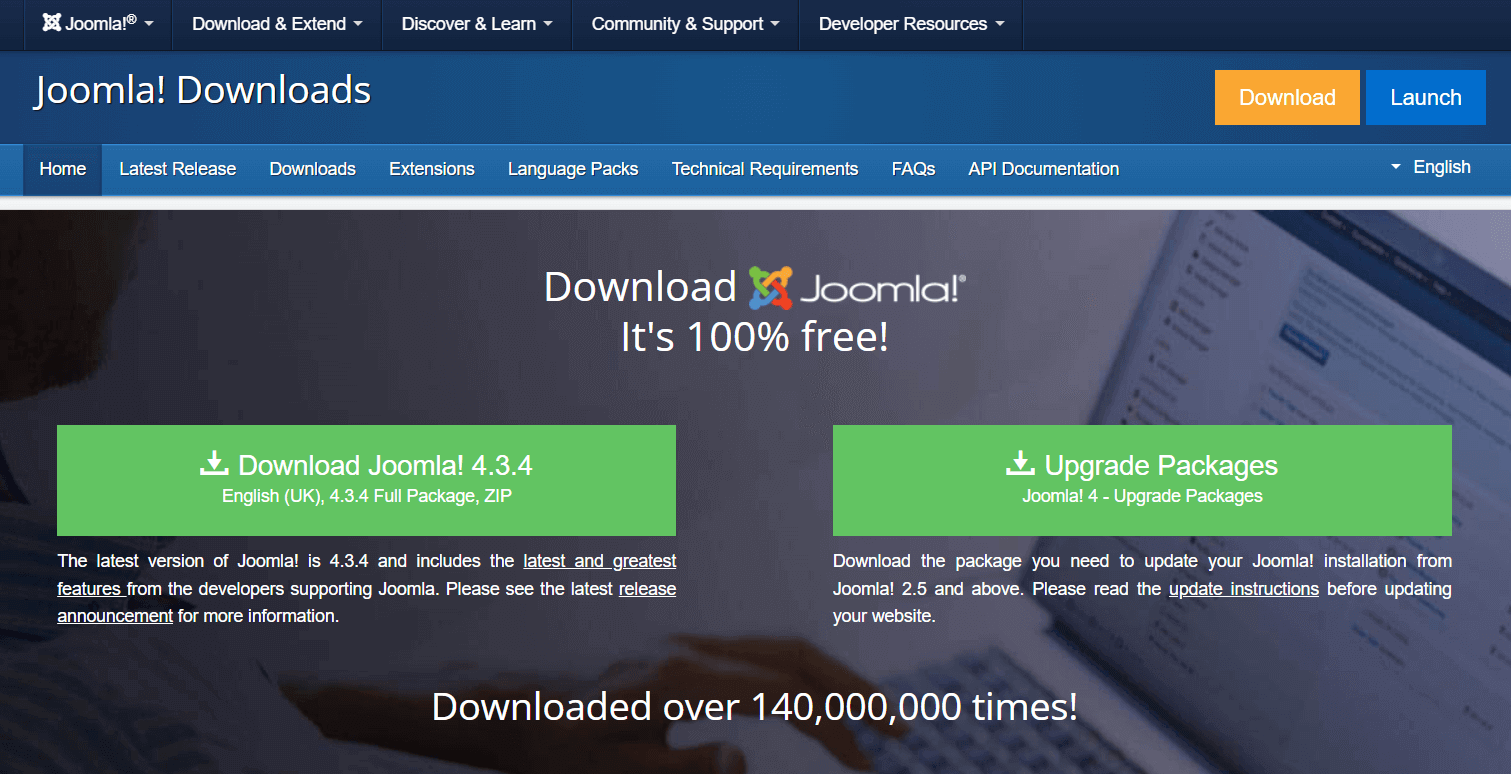
1. Visit the official Joomla website at https://downloads.joomla.org/
joomla main joomla main

2. Download the latest stable release of Joomla, which is usually available on the homepage.

Prepare Your Hosting Environment

1. Ensure you have access to a web hosting account that supports PHP and MySQL which areJoomla required. Most hosting providers offer one-click Joomla installations, but you can also install it manually.

Upload Joomla Files

Depend of hosting you have there are different ways to upload Joomla CMS files to your hosting.

3.1 Upload Joomla Files with "cPanel File Manager" or other "File Manager" which your hosting provide

1. If you have a hosting provider with cPanel or a similar control panel, log in to your hosting account.

2. Find the "File Manager" section, and access your website's root directory (usually "public_html" or "www").

3. Upload the Joomla ZIP file you downloaded to this directory.

4. Extract the contents of the ZIP file using the control panel's file manager.

OR

3.2 Upload Joomla Files with FTP

1. Extract the contents of the ZIP file (the Joomla ZIP file you downloaded in Step 1) to the any local folder on your PC.

2. Login to your hosting account with help FTP. You may use FileZilla or other FTP client

3. Access your website's root directory (usually "public_html" or "www").

4. Upload the extracted files to the directory.

Create a MySQL Database

There we have a few methods to create a Joomla MySQL Database. Check more details in this article.

Start Joomla Installation

1. Open a web browser and navigate to your website's domain name (e.g., http://yourdomain.com).

2. You will see the Joomla installation page. Choose your preferred language and click "Next."

Main Configuration

1. On the Main Configuration page, enter your site's name, description, username and your administrator email and password.

2. Make note of the administrator username and password; you will need these to log in to the Joomla admin panel later.

3. Click "Next."
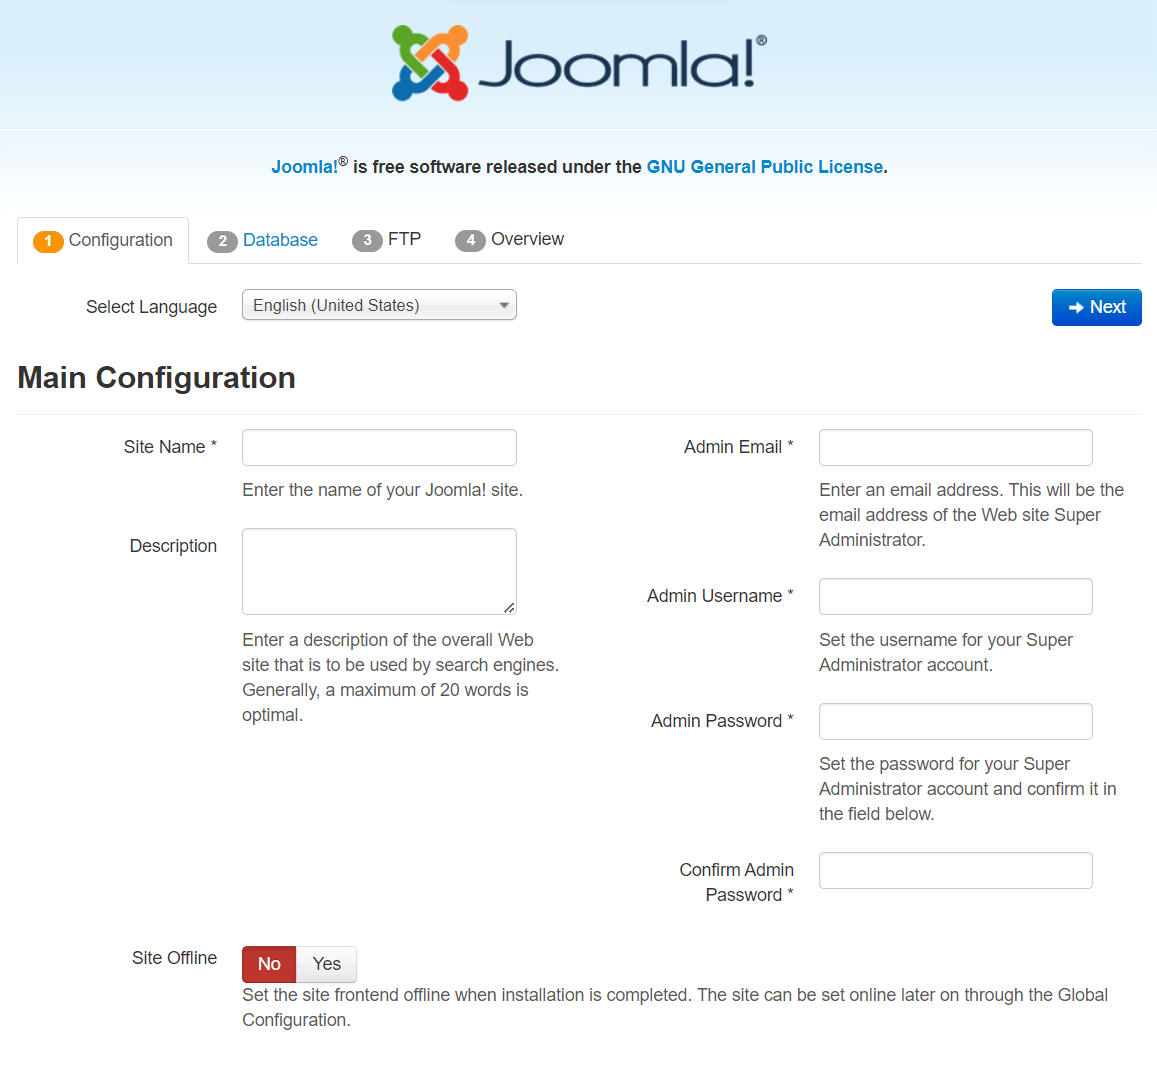
joomla install joomla configuration joomla install joomla configuration

Database Configuration

1. On the Database page, enter the requested information.

  • - Database Type: Select "MySQLi."
  • - Hostname: Enter the MySQL server name provided by your hosting provider (usually "localhost").
  • - Username: Enter the MySQL database username.
  • - Password: Enter the MySQL database password.
  • - Database Name: Enter the name of the database you created earlier.
  • - Table Prefix: Optionally, you can set a table prefix for security purposes.

Important: If you have ROOT login and password to My SQL server, you may set the MySql Root User name and Password for "DataBase UserName" and "DataBase Password" and Joomla will create that DataBase for you. BUT, this is important: It works better for local developers, not for real websites. If your website will be hacked - they will know your root database access to all your website on that hosting.
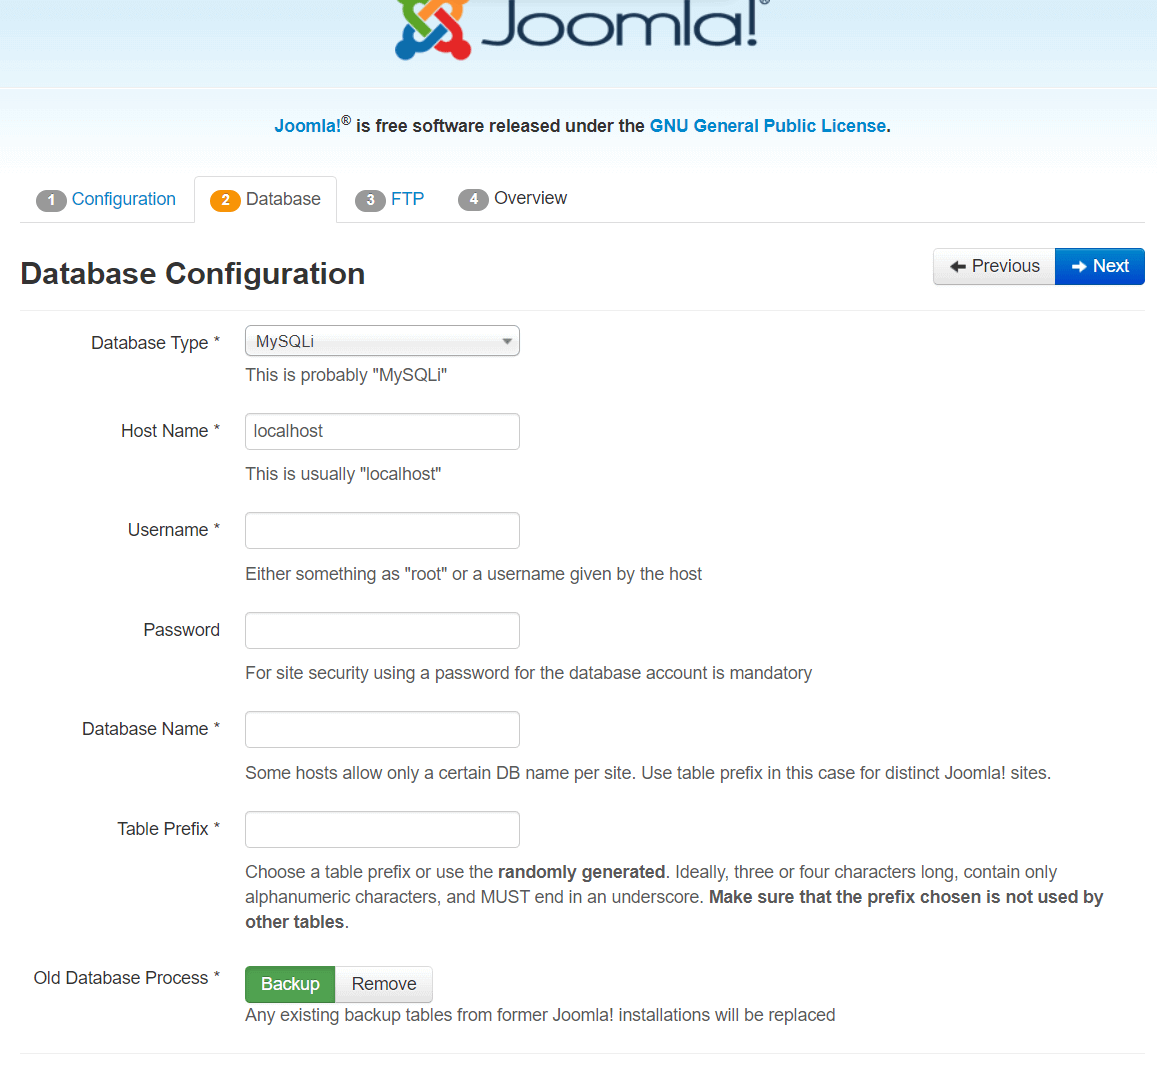
joomla install database configuration joomla install database configuration

2. Click "Next" to proceed.

Remove Installation Folder

1. Joomla will remind you to remove the "installation" folder for security reasons. Joomla will try do that but if there some error happened. You can do this using your hosting control panel's file manager or an FTP client.

2. After removing the installation folder, click "Next."

Joomla is Installed

1. Congratulations! Joomla is now installed on your server.

2. You can access your Joomla website by visiting your domain name (e.g., https://yourdomain.com).

3. To access the administrator panel, go to https://yourdomain.com/administrator and log in using the administrator username and password you set in Step 7.

That's it! You've successfully installed Joomla. You can now start customizing your website, adding content, and exploring features and extensions available in Joomla's admin panel.
Learn More about Joomla:

Ordasoft News Joomla Tutorials How To Install Joomla
 

How to "turn on" or "turn off" the Error report in Joomla

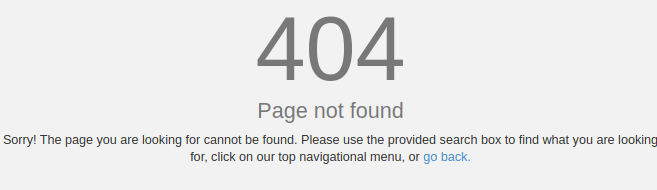
For each error, the Joomla CMS displays a Joomla error detail page or "404 error page".

joomla 404 error page

But sometimes situations occur on the site that the Joomla developer did not foresee, and a lot of warnings and notifications appeared on your site.

How to "turn off" the Error report in Joomla

Please check: you can't fix real errors with this method - only to hide them. To hide all Errors, Warrings and Notices please:

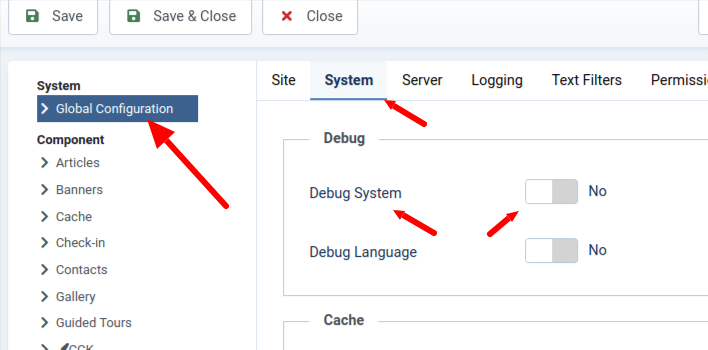
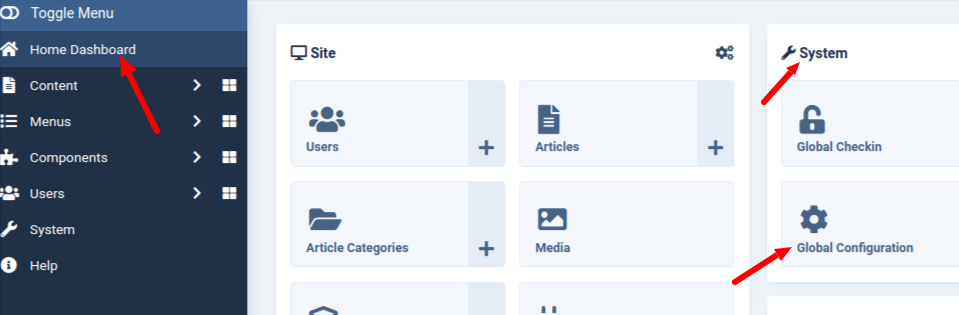
  • 1. Go to Joomla Admin → System → Global Configuration. joomla global configuration
  • 2. Tab "System" and turn off "Debug System". joomla global configuration system debug
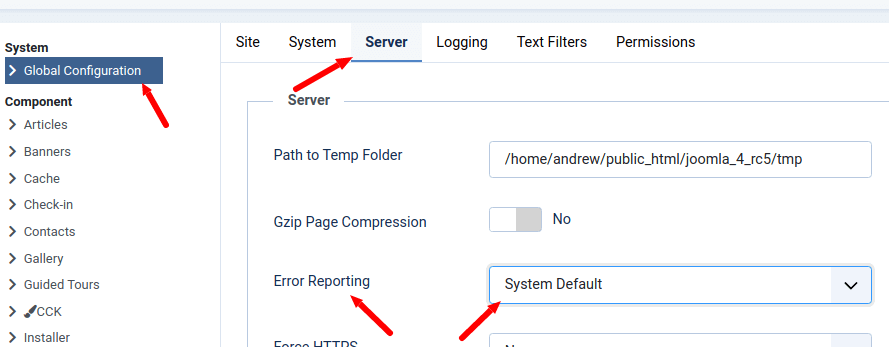
  • 3. Tab "Server" and set "Error Reporting" to "Default" or "None". joomla global configuration server error report

How to "turn on" the Error report in Joomla

To show all errors - you need to do the same as before, only vice versa.

  • 1. Go to Joomla Admin → System → Global Configuration. joomla global configuration
  • 2. Tab "System" and turn on "Debug System". joomla global configuration system debug
  • 3. Tab "Server" and set "Error Reporting" to "Maximum" or "Development"(Joomla 3). joomla global configuration server error report

How to "turn on" the Error report in Joomla, for developers

If your site doesn't work correctly, but you don't see any errors and you "turn on" error report in Joomla global settings:

  • 1. Check if you have error.php file on your template folder: {website}/templates/{your-template}/
  • 2. Copy error.php file from {website}/templates/system/ to your template folder: {website}/templates/{your-template}/
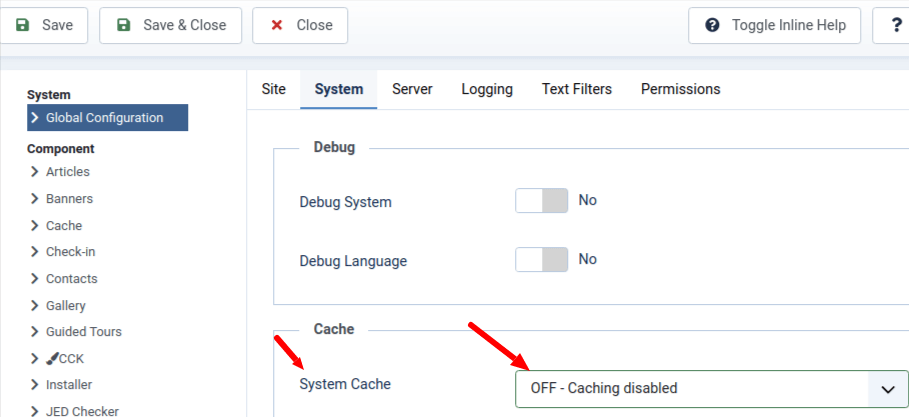
  • 3. Turn off Joomla cache. Go to Joomla Admin → System → Global Configuration → System, and turn off System Cache. joomla global configuration system cache
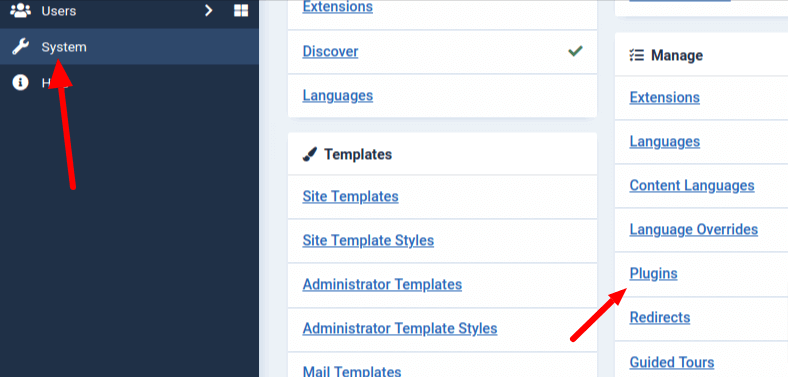
  • 4. Turn off all joomla cache and optimization plugins. Go to Joomla Admin → System → Manage → Plugins. In Joomla 3 you need go to Joomla Admin → Extensions → Plugins joomla system manage plugins
  • 5. Clear all cache.
    - In Joomla 3: System → Clear Cache and System → Clear Expired Cache.
    - In Joomla 4: System → Maintenance → Clear Cache.
  • 6. Turn off cache on your hosting and any optimization and speed up tools.
  • 7. In Browser for refresh cache, please press: Ctrl + F5. In Browser (chrome), please press F12, select tab "Network" and there select "Disable cache" checkbox, reload page.
  • 8. Reload your page.

More Joomla Tutotials:


How to setup your 404 error page in Joomla?

A 404 error page appears when a visitor tries to access a page that doesn't exist. Setting up a custom 404 page in Joomla is important for improving user experience, keeping visitors on your site, and even helping your SEO.

For each error in Joomla CMS, a "Joomla error detail page" or "404 error page" is displayed.

joomla 404 error page

When the "Show Errors" setting is turned off in "Joomla's Global Settings" → "Show Errors" and some error occurs or the user enters the wrong URL in the browser, the user will see a "404 error page".

More about: How to "turn on" or "turn off" the Error report in Joomla.

How to setup your Joomla 404 error page

1. With the help of FTP or cPanel or Joomla File Manager, go to {your-website}/templates/{your-template}/ and open file: error.php.

1.a If you don't have error.php file, go to {your-website}/templates/system/ or {your-website}/templates/cassiopeia/ and copy error.php file from there to your template folder.

Open 'error.php' and customize the HTML content. You can add:

  • Friendly message like: "Oops! Page not found"
  • Button to homepage;
  • Search form;
  • Links to popular pages;
  • Contact information.

2. In error.php file, at the file begin after row:

defined('_JEXEC') or die;

add code:

 if (($this->error->getCode()) == '404') {
  header('Location: your-wedsite-URL');
  exit;
 }

where: {your-wedsite-URL}, any correct URL on your website which you need for show users when 404 error happened.

3. If you are a "website developer" and you know PHP, you may change {your-website}/templates/{your-template}/error.php file exactly as you need for any errors types or set this page any design.

4. For Website developers: If your website is having a real error you need to debug it. Go to {your-website}/templates/{your-template}/error.php and remove code from for 404 error page redirect which you added before.

If you prefer an easier, no-code approach, you can use extensions such as: Redirect managers, SEO tools, Error page builders. These tools allow you to manage 404 pages, redirects, and track broken links.

More about Joomla Errors show settings:


How to install Joomla Module?

Also read How to install Joomla Module in Joomla 3?

Installing modules in Joomla 4, 5, 6 follows a similar process.

Log in to your Joomla administration panel.

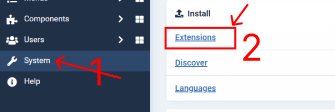
Once logged in, navigate to the "System" menu and select "Install" → "Extension".

install joomla module joomla system install joomla module joomla system

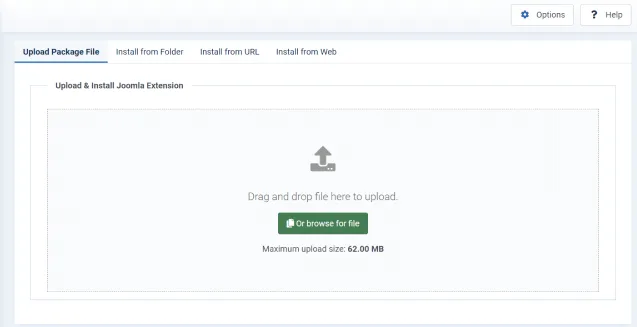
On the extension installation page, you have 4 options to install the module:

  • a. Upload Package File: If you have downloaded the module as a package file (usually a ZIP file) from the developer's website or a trusted Joomla extension directory, you can click the "Browse" button and select the package file from your computer. Once selected, click the "Upload & Install" button to install the module.
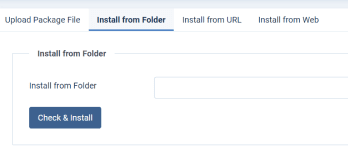
  • b. Install from Directory: If you have manually uploaded the module files to your Joomla server, you can specify the directory path in the "Install from Directory" field. Make sure the module files are in the correct directory structure as required by Joomla. After entering the directory path, click the "Install" button.
  • install joomla module joomla folder install joomla module joomla folder
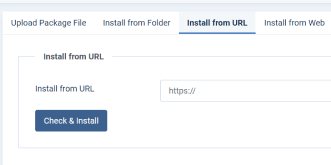
  • c. Install from URL: If the module is hosted on a remote server, you can enter the URL of the package file in the "Install from URL" field. Ensure that the URL points to a valid package file (ZIP file). Once entered, click the "Install" button.
  • install joomla module joomla url install joomla module joomla url
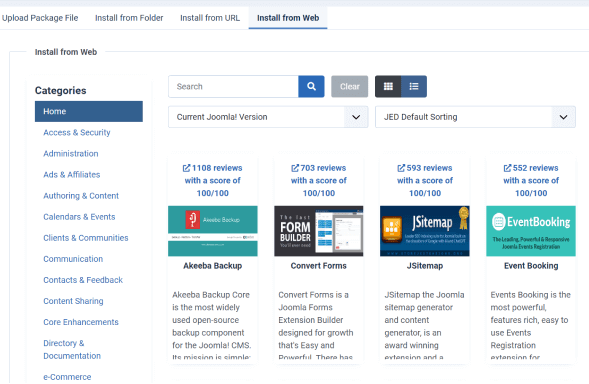
  • d. Install from Web: You will see the Install from Web tab to install an extension directly from the Joomla Extension Directory. You can select extensions to list by Category or you can search by partial name. Once you choose, click the "Install" button.
  • install joomla module joomla web install joomla module joomla web

Joomla will now process the installation and display a success message if the module is installed successfully. You may also see any additional instructions or configuration options specific to the module you installed.

To add new module or check all modules you have a few ways:

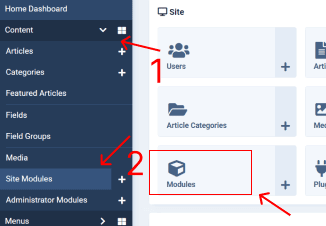
  • To get to modules page click "Content" → Site Modules. Or just click "Modules" on a Dashboard.
  • install-joomla module joomla site modules install-joomla module joomla site modules
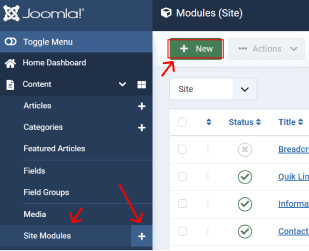
  • To add new module click "+" or "New" button.
  • install joomla module joomla add module install joomla module joomla add module

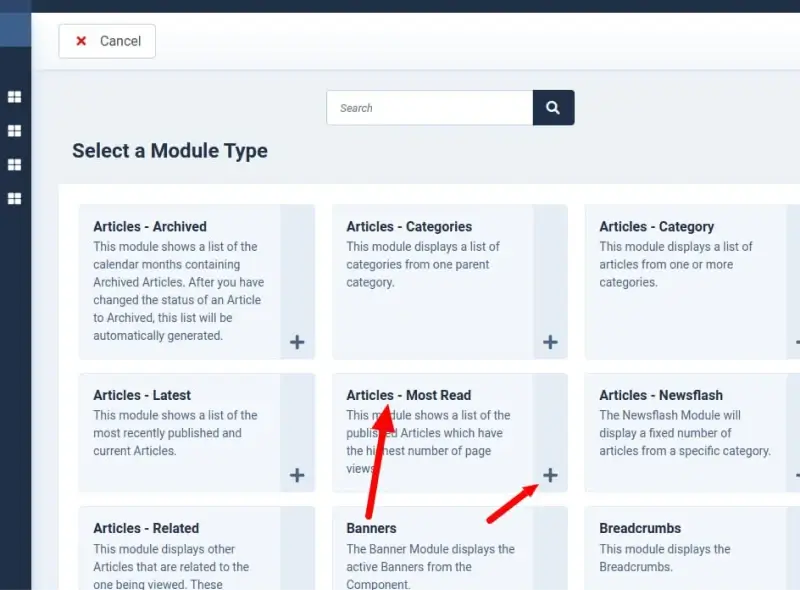
Now you need to select a module type which you installed or want to show. We show some standard Joomla Module

install joomla module joomla module type install joomla module joomla module type

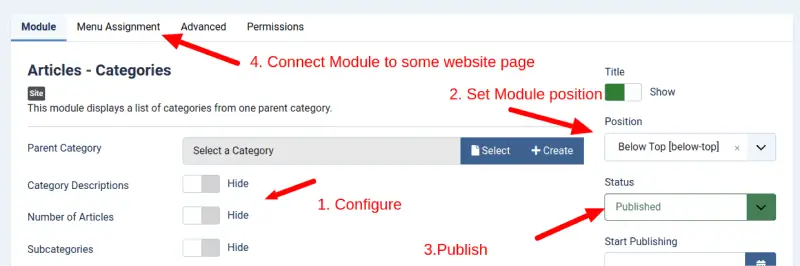
Check all settings, position your module on a page, publish it and connect to website pages. Make sure you setteled everything correctly or else it won't show your module.

  1. Configure
  2. Set Menu Position
  3. Publish
  4. Connect to website pages
install joomla module joomla module settings install joomla module joomla module settings

Other Joomla Documentation:

Ordasoft website development company


Page 5 of 8

»