How to Search and Replace Old URLs in Joomla

find replace url joomla

When migrating a Joomla website to a new domain or making structural changes to your content, you may encounter outdated internal links or image paths. Updating these manually can be time-consuming and prone to errors - especially on large websites. Fortunately, there are effective ways to search and replace old URLs in Joomla quickly and safely.

IMPORTANT: Before You Begin Make a Backup.

Before performing any changes, always create a full backup of your Joomla site. You can use extensions like Akeeba Backup to safely restore your site in case something goes wrong.

Use a Joomla Database Tool (phpMyAdmin)

You can perform a search and replace directly in the database using phpMyAdmin, which is available in most hosting control panels (like cPanel or Plesk).

Log in to phpMyAdmin via your hosting control panel.

Select your Joomla database.

find replace url joomla database

Click on the SQL tab.

find replace url joomla to sql

Run a query like this:

sql: UPDATE 'your_table'

SET 'your_column' = REPLACE('your_column', 'http://oldurl.com', 'https://newurl.com');

Example for articles:

sql:

UPDATE '#__content'
SET 'introtext' = REPLACE('introtext', 'http://oldurl.com', 'https://newurl.com'),
'fulltext' = REPLACE('fulltext', 'http://oldurl.com', 'https://newurl.com');

Important: Replace '#__content' with your actual table prefix (e.g., 'jos_content' or 'abc_content').

find replace url joomla update

Direct SQL changes are powerful but risky. Double-check your queries.

Use a Joomla Extension

If you prefer a safer, user-friendly approach, use a Joomla extension designed for search and replace.

DB Replacer (by Regular Labs)

find replace url joomla extension

Allows you to search and replace within any database table from the Joomla admin panel.

Supports partial or full-text search and offers a preview of affected rows.

  • Install DB Replacer from the Joomla Extensions Directory.
  • Go to Components → DB Replacer.
  • Select the table (e.g., 'content') and the columns to search in.
  • Enter the old and new URLs.
  • Click Replace.

Use Joomla Content Editor (JCE) Tools

If you're using the popular JCE Editor, it includes tools to edit URLs in articles more easily:

Open each article using the editor.

Use the HTML "Source" or "Link Inspector" tool to update individual links.

This is not ideal for large-scale updates, but helpful for spot-checking.

IMPORTANT: Don't Forget to Clear Joomla Cache.

After replacing URLs, clear your cache to make sure changes appear on the frontend:

  • Go to System → Clear Cache.
  • Select all items and click Delete.

Also, you can clear your browser cache.

Use ".htaccess"

The primary tool for this is the RewriteRule directive, part of Apache's mod_rewrite module.

  • Access to your .htaccess file: It's usually in the root directory of your website (e.g., public_html/, htdocs/, or /www/).
  • mod_rewrite enabled: It almost always is on standard hosting plans.
  • Use basic text editor: Like Notepad++ or VS Code. Avoid rich-text editors like Word.

First, you need to activate the rewrite engine. Your .htaccess file should typically start with these lines: RewriteEngine On.

1. Enable Rewrite Engine: RewriteEngine On.

2. Set the Base Directory: RewriteBase.

3. Rewrite URLs.

RewriteRule ^old_url/(.*)$ new_url/$1 [NE,R=301,L,NC]

RewriteRule ^old_url2/(.*)$ new_url2/$1 [NE,R=301,L,NC]

These are redirect rules that take visitors from an old URL path and send them to a new one.

RewriteRule: This directive defines a rule for how incoming requests should be rewritten (or redirected).

  • ^old_url/(.*)$: This is a regular expression that matches the requested URL.
  • '^' → means "start of the URL path".
  • 'old_url/' → matches the literal folder or path 'old_url/'.
  • '(.*)' → captures everything after 'old_url/' (zero or more characters).
  • '$' → means "end of the URL path"

Example: 'https://example.com/old_url/page1' → matches, and 'page1' is captured by '(.*)'.

'new_url/$1': This is the target (redirected) URL.

  • 'new_url/' → the new base path.
  • '$1' → inserts whatever was captured by '(.*)'.

Example: old_url/page1' → becomes 'new_url/page1'; 'old_url/some/sub/page' → becomes 'new_url/some/sub/page'

Flags: '[NE,R=301,L,NC]': These are special instructions for the rewrite.

'NE' = No Escape: Prevents Apache from escaping special characters in the output URL.

Example: '%20' stays as a space instead of being converted.

  • 'R=301' = Redirect with HTTP 301 status. Sends a 301 Moved Permanently redirect (good for SEO). Tells search engines and browsers: *“This page has moved permanently.”
  • 'L' = Last rule. If this rule matches, stop processing any further rewrite rules.
  • 'NC' = No Case: Makes the match case-insensitive.
  • 'old_url/' = 'OLD_URL/' = 'Old_Url/'.

Rule 1:

Any request starting with '/old_url/...' → gets redirected to '/new_url/...'.

Rule 2:

Any request starting with '/old_url2/...' → gets redirected to '/new_url2/...'.

'https://example.com/old_url/about' → 'https://example.com/new_url/about'

'https://example.com/old_url2/products/item1' → 'https://example.com/new_url2/products/item1'

These rules are set up to permanently redirect old URLs to new ones (with all subpages preserved), using a 301 redirect for SEO, in a case-insensitive way.

Replacing old URLs in Joomla doesn't have to be complicated. Whether you're a beginner using an extension like DB Replacer or a developer working directly with the database, there are safe and efficient ways to keep your site's links clean and accurate. Always back up first, test your changes, and clear your cache and your Joomla site will be cleaner, faster, and more SEO-friendly.
Other Joomla Documentation:

Ordasoft website development company

 
Ordasoft website development company

How to add an image to a Joomla Module

Adding Images to Joomla Modules

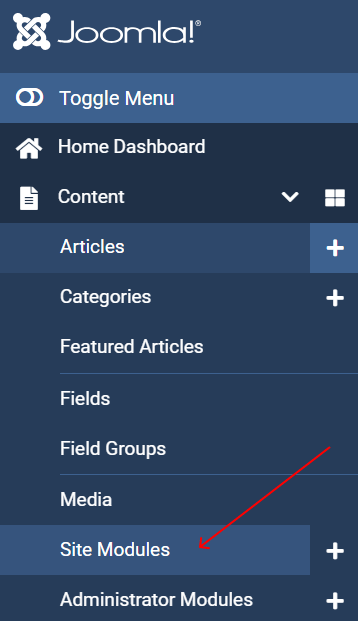
Go to "Content" → "Site Modules".

or

Go to "System" → "Manager" → "Site Modules".

how to add images in joomla modules how to add images in joomla modules

Choose the module you want to add an image to by clicking on its title to edit, or create a new module by clicking on "New".

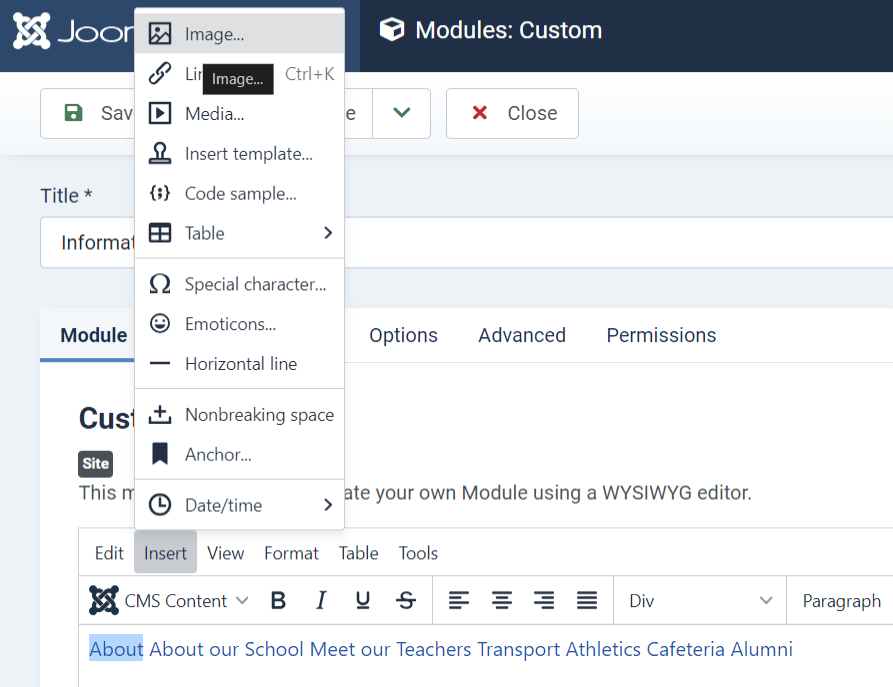
In the module editor, you can often find an option to add an image directly. Look for fields or options labeled "Image" or "Image URL".

how to add images in joomla insert images how to add images in joomla insert images

Upload your image or select an image from your media manager.

Adjust properties such as image size, alignment, and linking options if available.

After adding the image, remember to save your module.

Once you've added the images to your modules, make sure to preview your changes on the frontend to ensure everything appears as expected.

Read More about Joomla Custome Module, which you can use not only to add images, but to customize articles, add custom HTML, add other content etc.

Other Joomla Documentation:


How to Install Extensions in Joomla

joomla install extension

Joomla is a powerful and flexible content management system (CMS) that allows you to enhance its features by installing extensions. These extensions include components, modules, plugins, templates, and languages that add new functionality to your website - like contact forms, galleries, sliders, or SEO tools.

Joomla extensions are add-ons that expand what your Joomla site can do. There are five types:

  • 1. Components - Large features (e-commerce systems, forums).
  • 2. Modules - Smaller blocks (menus, login forms).
  • 3. Plugins - Background functionality (content filters, editors).
  • 4. Templates - Control the look and layout of your site.
  • 5. Languages - Add multi-language support.

IMPORTANT: Make a backup of your Joomla site. Ensure you're using a compatible version of the extension (Joomla 4.x, Joomla 5, etc.).

Download the extension in '.zip' format from a trusted source.

Install from Web (Easiest Way)

  • 1. Login to Joomla Admin ('yourdomain.com/administrator')
  • 2. Go to System → Install → Extensions.
  • joomla install extension system
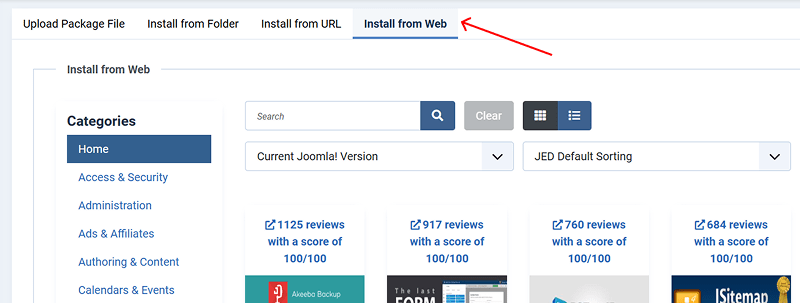
  • 3. Click on the 'Install from Web' tab.
  • joomla extension install from web
  • 4. Browse or search for the extension you want.
  • 5. Click Install and confirm.
  • joomla extension install

Joomla will download and install the extension automatically.

Upload Package File

Use this method when you've downloaded the extension manually.

  • 1. Go to System → Install → Extensions.
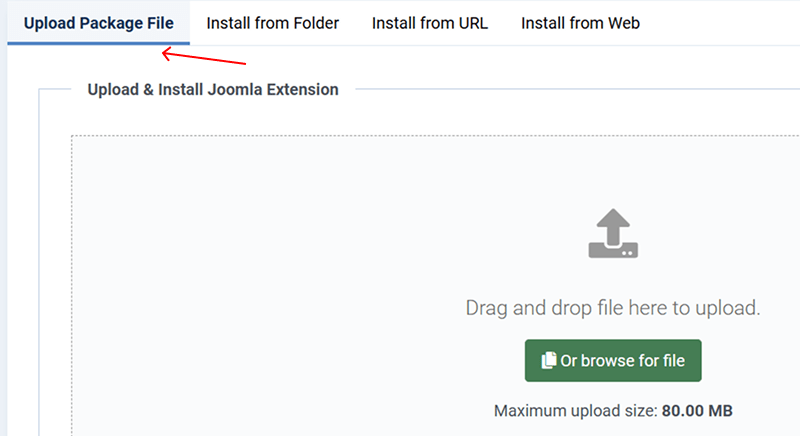
  • 2. Click the 'Upload Package File' tab.
  • joomla extension install from file
  • 3. Drag and drop the '.zip' file, or click Browse for File.
  • joomla-extension-installation
  • 4. Joomla will upload and install it automatically.

This is the most reliable method for custom or premium extensions.

Install from URL

If the extension provider gives you a direct URL to the package:

  • 1. Go to System → Install → Extensions.
  • 2. Click on 'Install from URL'.
  • joomla extension install from url
  • 3. Paste the URL of the extension's '.zip' file.
  • 4. Click Check & Install.

Useful for developers or advanced users installing from private repositories.

Install from Folder (Advanced)

Use this if you've uploaded the unzipped extension via FTP.

  • 1. Upload the unzipped extension folder to: '/tmp/' or a directory on your server.
  • 2. Go to System → Install → Extensions.
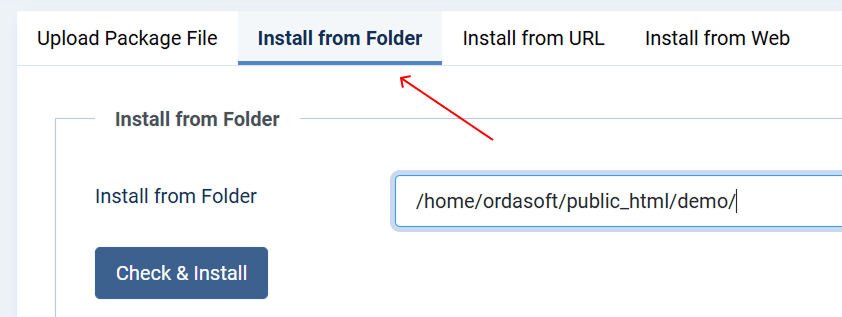
  • 3. Click 'Install from Folder'.
  • joomla extension install from folder
  • 4. Enter the folder path (e.g., '/home/user/public_html/tmp/my-extension')
  • 5. Click Install.

Only use this method if you are comfortable working with your server's file system.

Post-Installation Steps

  • Go to Components, Modules, or Plugins to configure the extension.
  • Some extensions require enabling after installation (e.g., plugins).
  • You may need to assign modules to specific positions in your template.
  • Check for any dependencies or updates.

Troubleshooting Installation Issues

Unable to find install package - Ensure the file is a valid Joomla extension and zipped.

Maximum upload file size exceeded - Increase PHP 'upload_max_filesize' in 'php.ini', or use FTP.

White screen or 500 error - Check error logs; disable conflicting plugins if needed.

Security Tip

Only install extensions from trusted developers or the Joomla Extensions Directory. Poorly built or outdated extensions can compromise your site's security and performance.

Installing Joomla extensions is a simple way to customize and expand your website's functionality. Whether you're adding a gallery, SEO tool, or e-commerce system, Joomla makes it easy through multiple installation methods.

Always back up before making changes, and take a moment to configure and test each extension after installation.

Other Joomla Documentation:

Ordasoft website development company


OrdaSoft Responsive Image Joomla Gallery

700.000+ Downloads!

last update: February 2025

JOOMLA 3.9.x - Joomla 4.x - Joomla 5.x

Free

Rate it:

( 4 Votes )

Gallery Layouts

Gallery Skins

Lorem Ipsum is simply dummy text of the printing and typesetting industry. Lorem Ipsum has been the industry's standard dummy text ever since the 1500s, when an unknown printer took a galley of type

joomla gallery skins

hover over the image to see the animation

joomla gallery skins

hover over the image to see the animation

joomla gallery skins

hover over the image to see the animation

joomla gallery skins

hover over the image to see the animation

joomla gallery skins

hover over the image to see the animation

joomla gallery skins

hover over the image to see the animation

joomla gallery skins

hover over the image to see the animation

joomla gallery skins

hover over the image to see the animation

joomla gallery skins

hover over the image to see the animation

joomla gallery skins

hover over the image to see the animation

joomla gallery skins

hover over the image to see the animation

joomla gallery skins

hover over the image to see the animation

Meet Joomla Gallery

Image Joomla Gallery is responsive, intuitive and simple Joomla gallery extension for creating the awesome photo galleries on your website. Rich functionality of Joomla gallery component will allow you to create a Photo Joomla gallery of any complexity: 6 gallery layouts, 12 hover effects, Fancybox 3, watermark, "Load More" button, support HTML/CSS, Youtube/Vimeo, Sharing, Download buttons and free support.

joomla gallery logo

For whom is our Photo Joomla gallery?

It is perfect for any type of sites: for photographers, artists, personal websites, corporation websites, blog websites, eCommerce and etc. We constantly update the OrdaSoft Responsive joomla gallery, we provide new opportunities, so that you can use only the best and modern component. So choose your photo Joomla gallery version (Free or Pro) and stay tuned!

Most Powerful Features of Joomla Gallery

joomla gallery new features

New image hover effects

new image hover effects

Choose a perfect hover effect. 12 different and creative effects for youre gallery

joomla gallery new features

Navigation Arrows

Navigation Arrows

Switch between images even more easily with the new navigation arrows. You don't need to close image settings and open it again, switch in just one click.

joomla gallery new features

Joomla 5 Support

Joomla 5 Support

Joomla 5 is out and it means that Joomla Gallery is updating on Joomla 5!

joomla gallery new features

Joomla Gallery Layouts

Joomla Gallery Layouts

Choose among 6 beautiful layouts (Default, Album, All in one etc.) which will suit the best.

joomla gallery new features

Image Thumbnail

Image Thumbnail

For more comfortable working with the gallery, now you can see the image on the right side of setting list.

joomla gallery new features

Load speed optimization for backend and frontend

Load speed optimization for backend and frontend

We have client with 1000+ images in one photo gallery and at one web page.

Gallery Shortcode

Gallery Shortcode

Now you may insert to other Joomla content not only Joomla gallery with all images. With the help of Joomla Gallery shortcode may insert 1 image, some images or images category.

Multi language

Multi language

Now you may add image title or image description to joomla gallery using multilanguage

Images Ordering

Images Ordering

Now you can order images in joomla gallery with Drag & Drop, By Title, By uploaded date, By file name

FancyBox 3

FancyBox 3

FancyBox 3 is a jQuery lightbox script for elegant displaying images, videos and other content. It supports TOUCH.

HTML/CSS Support

HTML/CSS Support

You can create your own style for image's presentation with the help of HTML & CSS in Joomla Photo Gallery and add video/audio files, buttons etc.

Share buttons

Share buttons

You have the opportunity to share your favorite images on social networks. We added the buttons: Facebook, Twitter, LinkedIn, VK and Odnoklassniki.

Responsive

Responsive

OrdaSoft image Joomla gallery is fully responsive for different screen sizes. Your users may see the Image Joomla Gallery with any device they want.

Watermark

Watermark

Designate a text or image watermark and apply this watermark to your images in responsive Joomla photo gallery.

SEO Optimization

SEO Optimization

Add unique title, alias, image alt, description to your images. Component in photo joomla gallery accomplished with text looks rich and perfect.

Support Images Masks

Support Images Masks

Now you may add some masks to images in our joomla gallery. So your images will look like stars or hearts or...

Import setting

Import setting

Now in joomla gallery component you don't need to set settings for every photo. You can just set all setting from another joomla gallery

100+ Settings

100+ Settings

You can easily configure every option and make yourself a perfect gallery

Uploading images from folder and .zip

Uploading images from folder and .zip

You can upload images by Drag & Drop as before, from the folder and using .zip file

Video/Audio

Video/Audio

We added the ability to upload videos in OrdaSoft Responsive Joomla Gallery. Since version 3.0 you can add YouTube video, Vimeo, Audio.

Drag & Drop

Drag & Drop

Professional OrdaSoft Responsive Photo Gallery for Joomla, allows to manage images in an easiest way, through Drag and Drop feature. Create image joomla gallery in a few minutes!

Joomla Gallery Documentation

How to install Responsive Joomla Gallery?

Responsive Photo Joomla Gallery - Joomla Gallery Extension

The installation process of Responsive Image Joomla Gallery is the same as standard Joomla installation of extensions - modules, plugins and components.

  • Download Responsive Image Joomla Gallery from OrdaSoft website to your local machine as a zip file package.
  • From the backend of your Joomla site (administration) select Extensions -> Manager -> Install.
  • Go to the download tab Upload Package file and click Or browse for file
  • Select the Ordasoft Joomla gallery zip file from the list, click Open and load OS Joomla Responsive Image Gallery - Joomla Gallery on your local machine.
  • You should see the message "Installation of the package was successful" and after that you can make settings about using OS Responsive Image Joomla Gallery - Joomla Gallery Component
  • Now you can go Components -> OS Gallery and use OS Responsive Image Joomla Gallery
How to upload-edit-delete image in Joomla Image Gallery-Joomla gallery extension?

Responsive Joomla Image Gallery - Joomla Gallery component

In our Image Joomla Gallery - Joomla Gallery component there is an opportunity to download more than one picture or photo, but several at once. You can also download immediately folder with pictures, several folders or if you have an archived folder, you can download it right away in zip format without unpacking it.

  • Go to Components -> OS Gallery
  • After you go to our Joomla Gallery, click the button "New" or go to an existing gallery in order to upload an image folder Joomla! Gallery.
  • To download the images folder, click on the bookmark Upload from folder and in the line that appears, write or copy the address where you can find this folder on your computer and then click download.
  • When you wrote the path, you can click on the download button and the pictures that were in the folder appear on the screen. After that you can specify another folder with pictures and these photos or pictures also appear after those that were downloaded earlier in Joomla Gallery.
  • Thanks to our Image Joomla Gallery component you can also upload the archived image folder to the Joomla Gallery, click on the Upload from Zip tab.
  • When you go to the Upload from Zip tab, click on the button to Choose file and in the window that appears, select the desired picture folder from the list in Zip format and click Upload. Pictures appear on the screen immediately after the category bookmarks. You can also download several picture folders in Zip format and the pictures appear on the screen in the order in which you downloaded the folders in Joomla Image Gallery.
  • When you uploaded images to OrdaSoft Image Joomla Gallery you may easy delete image or change image settings.
How to create joomla galleries in OrdaSoft Image Joomla Gallery?

OrdaSoft Image Joomla Gallery - Joomla Gallery Extension

After the installation process of Photo Joomla Gallery, it's time to create your first joomla gallery in Image Joomla Gallery.

  • Go to Components -> Gallery
  • Click on button New
  • To add images/photos to your first Photo Joomla Gallery, simply drag and drop images into special area.
  • By clicking on New category button, you get new category in Joomla Gallery of images created. The title of category can be edited with help of button Edit.
  • Thanks to our Photo Joomla Gallery you can set the following information for each image: name, alias, short description, alt, link and the purpose of the window. For this you need to click on the image itself in Joomla gallery as shown in the picture.
  • After you clicked on the image in Photo Joomla Gallery, you should see a table on your screen where you can make settings. There are two bookmarks Image Options and Category Options. On the Image Options tab there are such functions as: Title, Short Description, Image Alt, Link, Target, Html Code, Show main image in HTML code (Yes/No), Html position, Set Html Code block width as Main Image width (Yes/No), Video Settings.
  • On the Category Options tab there are such functions as: Alias, Show title, Title in caption, Publish.
How to insert photo joomla gallery into Joomla article or into joomla custom module?

OrdaSoft Image Joomla Gallery - Joomla Gallery Extension

Photo from Joomla Gallery can be easily inserted in Joomla article using special Gallery shortcode. After gallery creation in Joomla Gallery:

  • Go to Components -> Gallery
  • Right to joomla gallery created before, you'll see special short code, that can be copied and inserted in any Joomla article or custom Joomla module
  • After you have copied the code, go to the Content -> Site Modules.
  • When you come to the tab, you need to click the button "New" to select the Joomla module itself.
  • When you come to this tab, you will see many joomla modules, from which you need to select Custom.
  • After you selected Custom module, open window where you need to insert the code you copied. Then you need to make the following settings. Add title, in the drop-down list in the Position field, select the position where the Joomla gallery will be located on the site page, in the Status of selected option is Published.
  • After that you can go to the page of the site and see where the Joomla Gallery is located, see how the pictures or photos look and if you are not satisfied then make all the necessary settings and fix something that you do not like.

That's all! In the same way you can simply and momentally insert any Gallery from Joomla Gallery in any Joomla article or to other Joomla component.

Options of OrdaSoft Responsive Image Joomla Gallery

Responsive

You know now How to create joomla galleries in OrdaSoft Image Joomla Gallery, so lets have a look on a short overview of options that you can use in Joomla Gallery.

  • Go to Components -> OS Gallery
  • Choose any responsive image Joomla gallery created before or add new joomla gallery and in the top right side click on button Gallery Options

There you'll see three tabs of options Photo Joomla Gallery: General, Fancybox and Watermark

How to create YouTube video Joomla Gallery in Joomla with OrdaSoft Joomla Gallery?

Video gallery in Joomla Gallery extension

If you have wondered how to insert YouTube video with Joomla Gallery extension, and create into your website video gallery, this article will give you a detailed step-by-step guide.

Recently, our popular Responsive Image Joomla Gallery has a great opportunity to embed HTML code. This greatly expands the possibilities of the Photo Joomla Gallery, because now you can display video from such popular services as YouTube, Vimeo and other video hosting services in the lightbox of our Joomla! Gallery. Now you can insert into our Joomla Gallery component both the iframe of the video player and the whole page.

  • First step for create video gallery on website with Joomla Image Gallery-Joomla Gallery extension: Go to the "Components" -> "OS Gallery"
  • After that, create a new Photo Joomla gallery powered by joomla or click on the already created Joomla Gallery.
  • Go to the YouTube video which you want to paste into our Joomla Gallery, click the Share button under the video, then the Embed tab and copy all the code for creating your future video gallery in Joomla gallery.
  • Then this code needs to be inserted on the Image Options, which you will see when you click on the picture in the Joomla video gallery.

After that, go to joomla video gallery, click on IMAGE OPTIONS tab, insert your youtube code for image into field "Html code", click "Save and close".

After you insert Joomla gallery in Joomla article (or will show it in another convenient way), you can see YouTube video in Joomla Gallery

How to create html joomla gallery or joomla iframe gallery with OrdaSoft Image Joomla Gallery?

Responsive Image Joomla Gallery

Now our Joomla Gallery has the ability to display on your site in addition to the usual images - HTML code. This opens up the limitless possibilities of using our extension to insert in Joomla lightbox on your website not only images using a huge number of layouts and hover effects. Examples of this use can come up with a lot: you can insert any pages on your site in the Joomla iframe, you can insert video content in our Joomla Gallery component from most the popular video hosting Vimeo, YouTube, you can create tables, prices - all that allows you to do HTML.

Now we will look in detail at how to insert in the OS Photo Joomla Gallery a page in the iframe.

  • Go to the "Components" -> "Gallery"
  • After that, create a new Joomla Gallery or click on the already created.
  • After you have selected a responsive Photo Joomla Gallery from the list, click on any picture and in the window that appears you can insert the HTML code.
  • After you click on the picture in the window Image Joomla Gallery - Joomla Gallery component that appears, you can enter the HTML code as shown in the picture.
  • Now you need to close the window Photo Joomla Gallery where you entered the code and click save or save and close. Now you can go to the site page and reload it to see the changes.
  • You can also follow the instructions as shown in the picture, upload any image (1) or click on the already downloaded (2), click on IMAGE OPTIONS tab (3), insert your html code for Joomla iframe in field "Html code" (4), click "Save and close" (5)

After you insert Joomla gallery in Joomla article (or will show it in another convenient way), you can see the result in Joomla Gallery

Joomla Gallery Shortcode: how to use gallery joomla shortcode

What is Joomla Shortcode

"Joomla Shortcode" are short digit sequences, that are used to insert a small code fragment that allows you to insert specific effects into the article.

Joomla Gallery Shortcode is Joomla small code fragment that allow you to save time! By using Gallery shortcodes in your website, you don't need to upload a new photo every time. You could, for example, have a Gallery shortcode {os-gal-1} that when typed out exactly like that, would display the most popular photos on your Joomla website. Where 1 is ID number of your Photo Gallery.

By inserting only the "Gallery shortcode" you will immediately have most popular photos where you need it. A Joomla shortcode takes away the need for every time add photos, and simplifies things for you.

Joomla Gallery works with popular Joomla Extensions

And that is not all of them, choose extensions you need and start creating a perfect website with our Responsive Joomla Gallery

Even More Features in Joomla Gallery

Features

Show Title and Description at image over

Show Title and Description at image top

Show Title and Description at image bottom

Support jpeg, png, gif, webp - image file formats

Load speed optimization for backend and frontend, we have client with 1000+ images in one photo gallery and at one web page.

Images Drag & Drop upload

Support of FancyBox

Support Touch Slider in FancyBox

Upload photos from zip

Upload photos from folder

Responsive (Excellent view on mobile devices)

From HTML to Fancybox Support

Native Support of Youtube Video

Native Support of Vimeo Video

Social Share buttons (Facebook, Twitter, Vkontakte, Odnoklassniki, Pinterest, Linkedin)

Photo Download button

Excellent Images Gallery Layouts

Excellent Images Hover Effects

Display images effects

Unlimited images or photos

Unlimited categories of images

Unlimited joomla galleries of images

"Load More" Button, LazyLoad - unlimited images, but light site

"Load More by Scroll", LazyLoad - unlimited images, but light site

"Load More auto", LazyLoad - unlimited images, but light site

Copyright links

Multilangauge Support

Image Shortcode support

Images Category support

Free Support

Import settings from another OrdaSoft Joomla gallery

Images Ordering by Drag & Drop

Images Ordering by image upload date

Images Ordering by file title

Images Ordering by photo title

More... ( Check Demo )

download package

Basic

free

1 layout

1 layout

1 layout

1 layout

2 hover effects

5 Images mask

1 Display Images effects

one time payment

Pro

29$

6 layouts + sublayouts

6 layouts + sublayouts

6 layouts + sublayouts

6 layouts + sublayouts

12 hover effects

27 Images mask

20 Display Images effects

 
Ordasoft website development company

How To Add HTML or JavaScript Code to Joomla

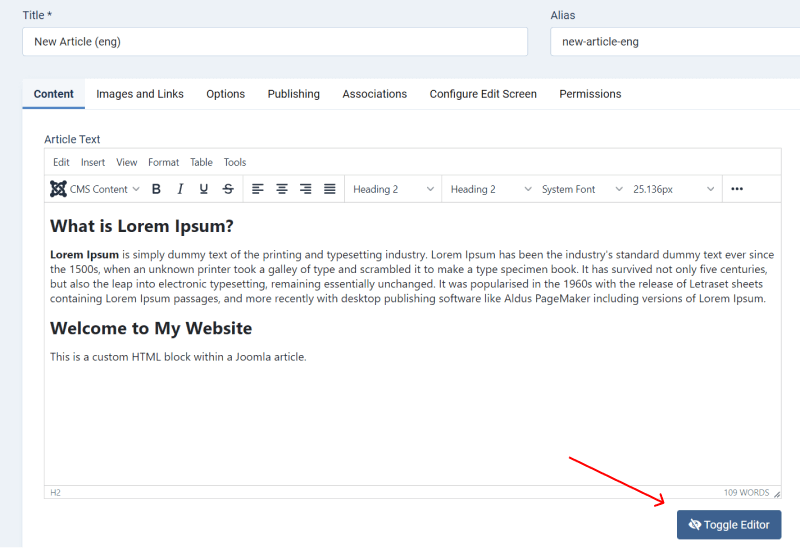
IMPORTANT: Joomla's default text editor (TinyMCE or JCE) may strip out HTML or JavaScript for security reasons. You need to switch to the code editor to add your custom code.

Toggle the Editor

  • If you're using TinyMCE, click the "Toggle Editor" button beneath the article content box. This will switch from the WYSIWYG editor to a plain text editor where you can safely add HTML and JavaScript code.
  • joomla custom html to articles switch editor joomla custom html to articles switch editor
  • If you're using JCE or another editor, there might be a similar button or option to view the source code.

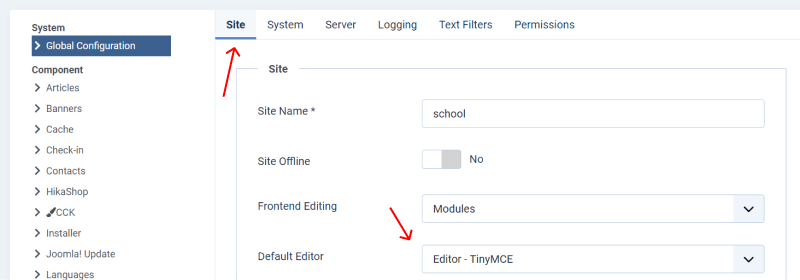
Or you can also change it in Global Configuration.

  • Go to "System" > "Global Configuration".
  • Under the "Site" tab, look for "Default Editor" and try another editor from the list.
  • how to add map configuration editor how to add map configuration editor
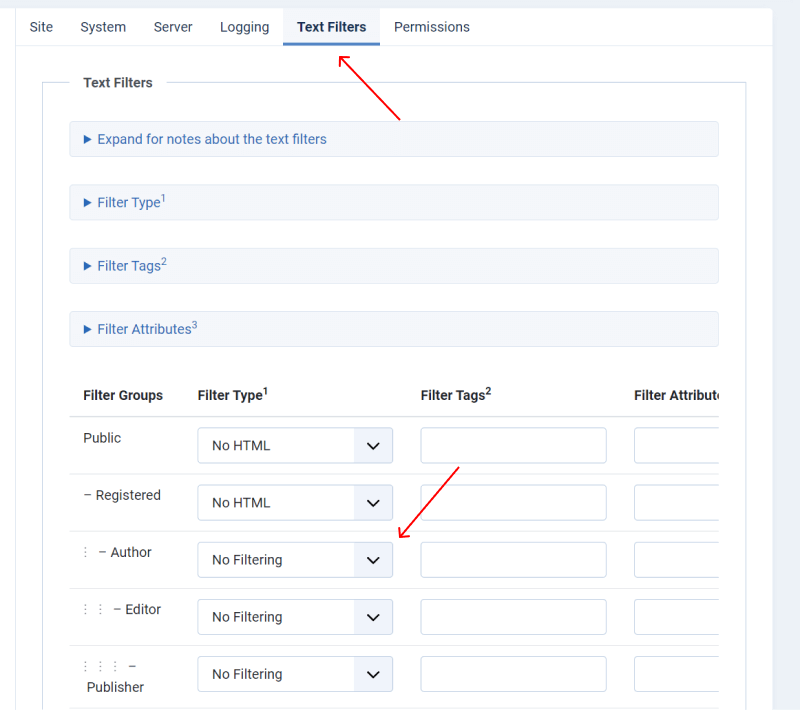
  • Also, try navigate to "Text Filters" and change "Filter Type" to "No Filter". Only for Super Admin.
  • how to add map text filters how to add map text filters
  • Click "Save & Close".

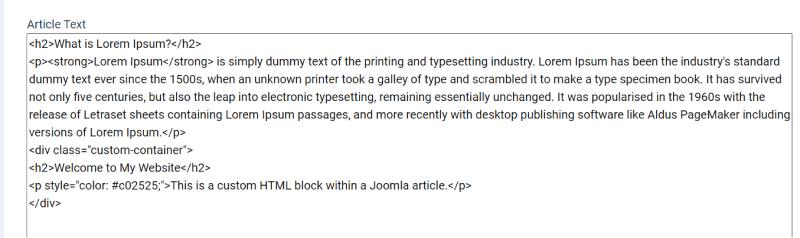
Add HTML or JavaScript Code

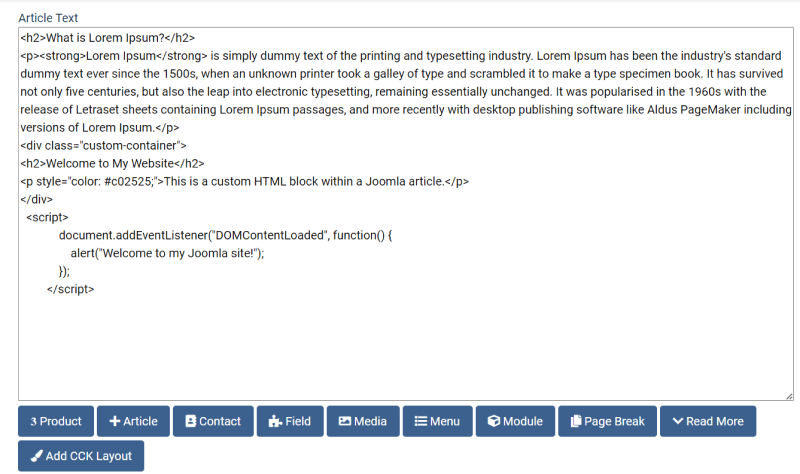
In the plain text editor, you can directly write or paste your HTML code. For example:

joomla custom html to articles editor joomla custom html to articles editor
joomla custom html to articles styles joomla custom html to articles styles

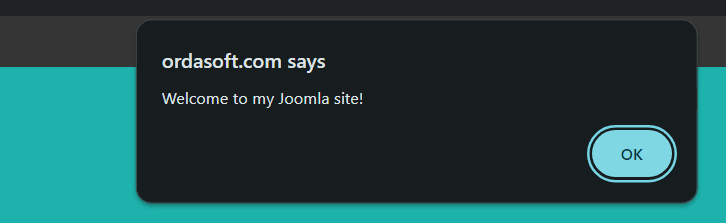
Or You can also add JavaScript within "script" tags. For adding JavaScript it's better to change Editor in GLobal Configuration to "Editor - None" if you have any issues.

joomla custom html to articles javascript joomla custom html to articles javascript
joomla custom html to articles js frontend joomla custom html to articles js frontend

After adding your HTML and JavaScript, click "Save" or "Save & Close" to save your changes and exit the editor.

Configure the Text Editor (If Necessary)

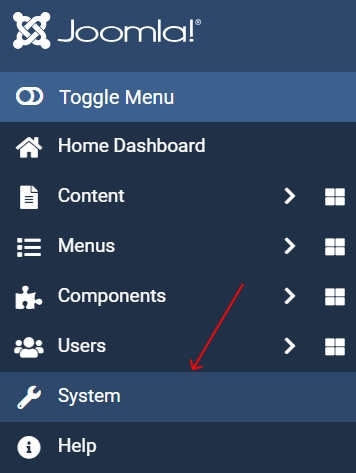
  • Go to "System" in the top menu.
  • joomla custom html to articles to system joomla custom html to articles to system
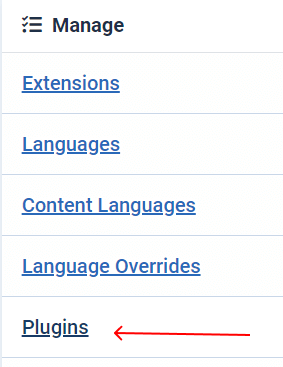
  • Under the "Manage" section, click on "Plugins."
  • joomla custom html to articles to plugins joomla custom html to articles to plugins
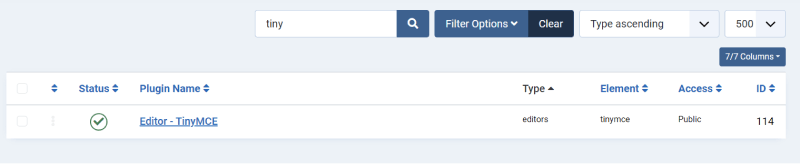
  • In the search box, type "TinyMCE" to find the TinyMCE editor plugin.
  • joomla custom html to articles tinymce settings joomla custom html to articles tinymce settings
  • Click on the "Editor - TinyMCE" link to access its settings.
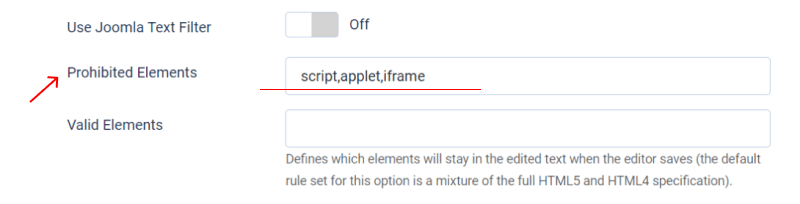
  • Under the "Prohibited Elements" section, remove any elements that you want to allow (e.g., script, iframe).
  • joomla custom html to articles prohibited elements joomla custom html to articles prohibited elements
  • This way you can enable HTML code.
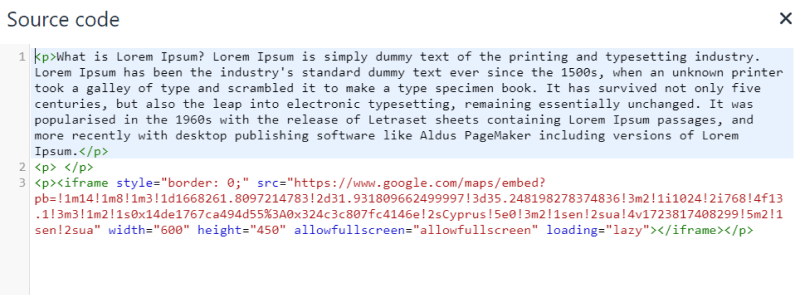
  • Adding iframes in Joomla

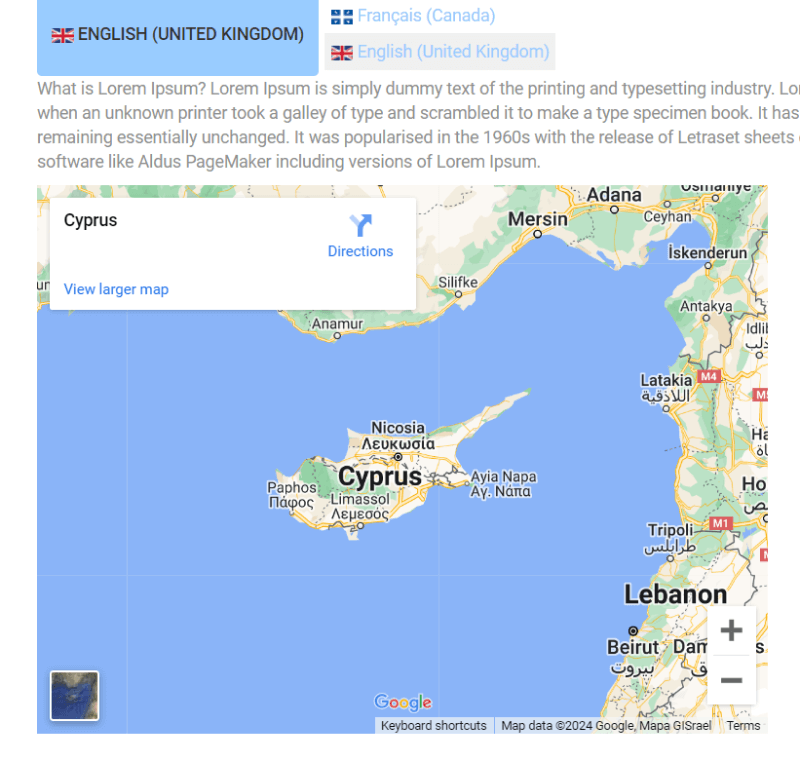
    You can also add iframes to Joomla articles or custom HTML modules. Adjust the text editor settings to allow iframes and add it into your content.

    joomla custom html to articles iframes joomla custom html to articles iframes
    joomla custom html to articles map joomla custom html to articles map

Other Tutorials for Joomla:


Page 2 of 8

»